Your landing page has about eight seconds to convince a skeptical visitor that your product is worth a click.
Text copy helps. Social proof helps. But nothing closes that gap faster than watching the product actually work. A visitor who sees your SaaS doing its thing in 60 seconds has far more context than one who reads three bullet points about features. They’ve seen the interface. They understand what the workflow looks like. The abstract becomes concrete.
The problem is that “make a SaaS demo video” sounds like a project. The conventional advice points you toward motion design agencies charging $3,000 to $15,000, interactive demo platforms running $300 a month, or a video editor and two days of your life. For a bootstrapped founder or a two-person product team, none of those are realistic options on a Tuesday afternoon.
Here’s the thing: the best-converting SaaS demo videos are often not the most expensive ones. They’re the most clear ones. A well-recorded 75-second screen recording that shows your product solving a real problem will outperform a polished animated explainer that shows nothing real. Because what converts isn’t production value. It’s believability. Watching actual software work is more believable than watching a designer’s impression of it.
This guide is about making that recording. The one that’s clear, focused, shows your product at its best, and takes an afternoon, not a quarter.
The Difference Between a Demo Video and Everything Else
Before recording anything, it’s worth being precise about what a SaaS demo video actually is, because the word “demo” gets used for three different things that require completely different approaches.
A demo video is persuasive content for people who haven’t bought yet. Its entire job is to make a stranger believe your product is worth their time and money. It lives on your landing page, in cold outreach emails, in investor updates, and in ads. The viewer’s question is “should I care about this?” and the video has to answer yes in under 90 seconds.
A product tutorial is instructional content for people who already use your product. It answers “how do I do this specific thing?” It assumes interest. It can be longer and more detailed. It lives in help docs and onboarding emails.
A product tour tries to show everything the product does to everyone. It usually runs six to ten minutes and gets watched by almost nobody.
Most SaaS teams make the mistake of recording a tour when they need a demo. The result is a video that starts with “welcome to our platform, let me show you around” and covers nine features in eight minutes. Prospects don’t watch it. It looks thorough and converts nothing.
A demo video shows one scenario, one result, in under 90 seconds. That constraint is not a limitation. It’s the whole game. The discipline of cutting your product down to one most-compelling thing is what makes a demo convert.
What Your Demo Video Needs to Do in Under 90 Seconds
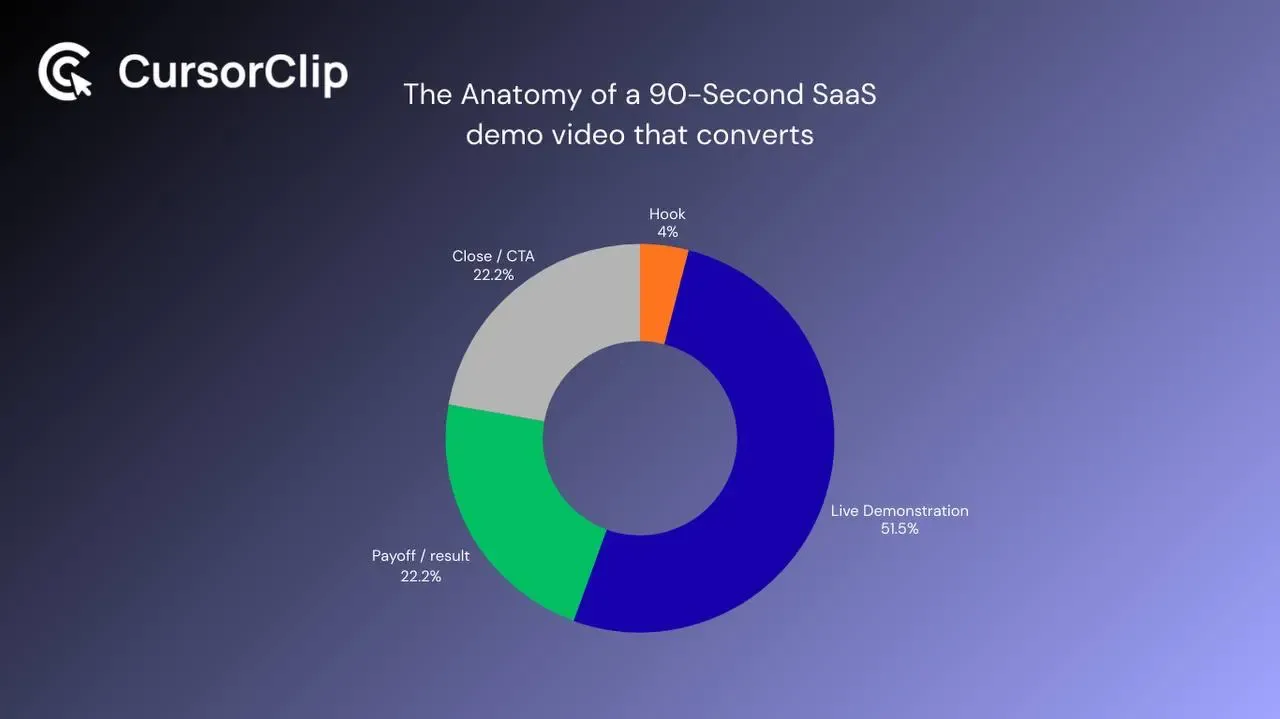
The structure of a high-converting SaaS demo video is almost always the same, regardless of what the product does. Here’s how it breaks down:
| Seconds | Job | What happens |
|---|---|---|
| 0 to 4 | Hook | Show the problem or the result, no intro, no logo |
| 5 to 50 | Demonstration | The product solving that problem, step by step |
| 50 to 70 | Payoff | The finished output, the completed workflow, the result |
| 70 to 90 | Close | What the product is, who it’s for, or a CTA |
Seconds 0 to 4 are the entire battle. Most demo videos open with a logo animation, a tagline card, or a founder saying “hi, I’m going to show you our product today.” All of that is dead time. The visitor’s thumb is already on the scroll. Start with something real: the product doing something impressive, a before-state that makes the problem obvious, or the output that results from using your product. No warmup.
The demonstration should show one scenario. Pick the use case that best represents your product’s value for your primary buyer. Not the most technically impressive feature, but the one that makes someone go “I need this.” A project management tool doesn’t demo its settings page. It demos a deadline getting caught before it’s missed.
End on the payoff, not the navigation. The last frame the visitor sees before the video ends should be the result: the generated report, the automated workflow, the completed action. Ending on a navigation click back to the home screen wastes the most valuable real estate in the video. End on the thing that made someone want your product in the first place.
Why Most Self-Made Demo Videos Look Bad (and the Fix)
There are two ways to make a SaaS demo video in-house. The first produces something that looks raw and unprofessional despite having good content. The second produces something that looks edited and polished despite taking no more time. The difference is almost entirely about one problem: zoom.
When you record a screen on a Mac, your application window is 1200 to 1400 pixels wide. Inside that window are buttons, dropdowns, input fields, and menus that are 14 to 20 pixels tall at normal UI scale. On your display, you can read them clearly. On a visitor’s laptop screen, or worse, on their phone, the same recording shows a cursor moving around what looks like a tiny, unreadable interface. They can’t see what you’re clicking. They can’t read the text. The product looks confusing regardless of how clear the actual workflow is.
The traditional fix is manual keyframing in a video editor. Scrub through the timeline, add a zoom effect at every meaningful interaction, adjust the position and scale, ease in, ease out, repeat. For a 90-second demo with twelve key interactions, that’s an hour of editing work on top of the recording time. For most founders, that time cost means the demo never gets made or never gets updated.
The modern fix is a screen recorder that handles zoom automatically during recording. CursorClip tracks your cursor as you record and applies smooth zoom-and-pan that follows whatever you interact with. As you click through menus and navigate between sections, the zoom follows automatically. The output looks like someone carefully added zoom keyframes to every key interaction in post-production. It took no additional time because it happened during recording. For a tool-focused breakdown, read the guide to choosing a screen recorder for SaaS demos on Mac.
The difference in how the same content reads to a viewer is significant. Without zoom, a demo recording shows your full interface and relies on the viewer to track what matters. With cursor-follow auto-zoom, the viewer is always looking at exactly what you’re interacting with, at a scale where they can actually read it.
Before You Hit Record: The Setup That Determines the Output
The recordings that look visibly rough almost always skipped this step. Ten minutes of setup before recording determines the next 30 minutes of output.
Create a clean demo account. Your real account has years of data, odd configurations, old projects with test names, notification dots, and whatever state you left things in last time you were working. None of that is what a prospective customer should see. Create a dedicated demo account and populate it with data that looks like real, active usage, not “Test Project 1” or blank fields, but realistic names, plausible numbers, a state that suggests the product is being used by someone who knows what they’re doing.
Record the application window, not your full display. Every serious screen recorder on macOS lets you select a specific window rather than your entire screen. Do this without exception. Full-screen recordings show your dock, open browser tabs, desktop clutter, and everything else unrelated to what you’re demonstrating. Window recording shows your product and nothing else.
Set a deliberate window size. 1280×800 or 1440×900 records cleanly at 1080p. Consistent size across all your recordings makes your video library look intentional. After you ship your demo video, you’ll want feature videos, social clips, and changelog GIFs that feel visually consistent with the main demo. Starting with a consistent window size makes that easy.
Enable Do Not Disturb before every session. System Settings, then Focus, then Do Not Disturb. One notification banner appearing over your interface mid-recording makes the take unusable. This takes five seconds. Do it before every recording, not once and forget.
Rehearse the specific flow twice. Not to memorize lines, but to confirm the sequence is as clean as you think it is. Hesitation in a demo reads as unfamiliarity with the product. Two dry runs through the flow eliminates most of it. Any step where you pause to think during rehearsal is a step to cut or simplify before recording.
Recording the Demo: What Deliberate Looks Like
With a clean environment and a rehearsed flow, most demo recordings take one or two takes. Here’s what deliberately paced recording looks like in practice.
Open CursorClip, select the application window, start recording. Setup takes under a minute. Select window capture, not full screen.
Move at 60 to 70% of your normal navigation speed. You know your product so well that your natural speed is too fast for someone seeing it for the first time. Deliberately slow down. Every step should feel slightly unhurried. On screen, that reads as confident and clear.
Pause for one second before each key interaction. Before clicking anything important, a button, a dropdown, a navigation item, let your cursor rest on it. This gives auto-zoom time to settle on the element and gives viewers time to visually locate what you’re about to interact with on their own screen. Skipping this pause is what produces the “wait, where did they click?” confusion that kills demo comprehension.
Show the output before moving on. After each meaningful action produces a result, let the result sit on screen for two to three seconds before proceeding. Viewers need time to read, register, and appreciate what just happened. Immediately navigating away from a successful result means most viewers miss it.
End recording on the final payoff. Whatever your demo’s climax is, the completed workflow, the generated output, the automation kicking in, that’s your last frame. Stop recording there. Do not navigate back to a home screen or close the result.
Audio: When to Use It and How to Make It Work
Audio is not required for a good demo video. Some of the most effective SaaS demos are entirely silent, clean screen recordings that communicate the product’s value purely through what’s shown. For landing page hero videos in particular, silent with captions often outperforms narrated, because autoplay landing page video is almost always muted.
Where narration adds real value: workflows where the purpose of an action isn’t visually obvious. If someone watches your product calculate something or run a process and it’s not immediately clear what they’re seeing, narration provides that context. “This is where the AI analyzes the incoming data and flags anything outside the normal range” does something the visuals alone cannot.
Where narration adds nothing: any step where the action and its result are self-explanatory. “Now I’ll click the Export button” is narration that describes what’s visible. Nobody needs that.
If you narrate, the microphone matters more than most people expect. The built-in MacBook mic records keyboard clicks, room echo, and ambient noise. It makes recordings sound like a FaceTime call, which is the opposite of the impression you want a demo video creating. A directional USB condenser microphone at six to eight inches from your face changes the audio character completely. The Rode NT-USB Mini ($99) and the Elgato Wave:3 ($150) are the two most reliable options at this price. Either one, properly placed, makes narration sound professionally recorded without a studio. If your demo also needs product sound, browser audio, or app audio, use the MacBook-specific guide to screen recording with audio.
A note on captions: if your demo video will appear anywhere it might autoplay muted, such as landing pages, social media, or email embeds, burn in captions. A viewer who watches your demo muted should still understand what’s happening. Short descriptor captions appearing at key moments (“connects to your existing CRM in one click”) communicate what narration would have, silently.
The Right Format for Every Destination
A demo video isn’t one file. The same recording gets repurposed into different formats depending on where it lives, and getting the format wrong means either a file that won’t load, one that loads slowly, or one that requires an extra click to play.
| Destination | Format | Ideal length | Key setting |
|---|---|---|---|
| Landing page hero | MP4 | 60 to 90 seconds | autoplay muted playsinline loop, plays without click |
| Above the fold / feature section | GIF or MP4 | 10 to 20 seconds | Short loop of the single most impressive interaction |
| Cold outreach email | GIF thumbnail → video link | 5 seconds preview | GIF plays in email; click goes to hosted video |
| Twitter / X | MP4 | 30 to 45 seconds | Under 512MB, sound optional |
| MP4 | 45 to 60 seconds | Captions strongly recommended, most LinkedIn video plays muted | |
| Investor update | MP4 | 60 to 90 seconds | Full narrated version, 4K if available |
| App Store / product directory | MP4 | Under 30 seconds | First 5 seconds must communicate value without sound |
| Changelog / feature release | GIF | 10 to 15 seconds | Shows only the new interaction, loops cleanly |
| Sales follow-up email | MP4 link via Loom or Wistia | 60-90 seconds | Personalized version if possible; analytics tell you who watched |
On the landing page specifically: using a native HTML <video> element with autoplay muted playsinline loop is significantly better than an iframe embed from a video host. It plays immediately without a click, loads faster, doesn’t introduce tracking scripts, and keeps visitors on your page rather than sending them to YouTube or Vimeo. A 75-second 1080p MP4 is typically 4 to 10MB, fast enough to load before a visitor reaches that section on any reasonable connection.
For the GIF format: CursorClip exports optimized GIFs natively, which matters because GIF file size is determined by color palette and frame rate at export time. A poorly optimized 15-second GIF can be 25MB while a well-optimized one of the same content runs 4MB. The difference in load time is visible.
What Makes a SaaS Demo Video Actually Convert
There are demos that get watched and demos that get ignored. After looking at what separates the two, the same factors appear consistently.
Starting with the product, not a frame. Every second of intro before the product appears is a second where the visitor hasn’t seen the thing they came to evaluate. Start with the product on screen and active.
Showing a human outcome, not a feature list. “Connects to 500+ apps” is a feature. “Your Slack message turns into a tracked task in three seconds” is an outcome. People buy outcomes. Demo the outcome.
Believable data. A demo showing realistic-looking usage data, such as real project names, plausible numbers, and a state that looks like active use, builds subconscious trust. Demo accounts with “Lorem Ipsum Project” and five blank entries do the opposite.
A result the viewer can imagine themselves getting. The best demos make the viewer think “I could have that.” Not “wow, impressive” but “that’s the thing I’ve been trying to do.” The difference is whether you’ve chosen a scenario that matches your actual user’s life or a scenario that shows off technical complexity.
Short enough to watch twice. A visitor who watches your demo twice has already invested more attention than most marketing content gets. Ninety seconds is short enough that someone who was half-distracted the first time will watch it again. Two minutes is usually still fine. Four minutes will be watched once by highly motivated visitors and nobody else.
The DIY vs Agency Question
The conventional wisdom is that SaaS demo videos need professional production to convert. The evidence doesn’t support this.
Wistia’s research on video length and engagement consistently shows that viewer retention is driven by content quality and length, not production value. A 75-second screen recording of your actual product working clearly outperforms a two-minute animated explainer showing a stylized version of it, because the screen recording is real and the animation is a representation of reality.
Where agency production genuinely wins: brand-awareness campaigns where aesthetic sophistication is part of the message, enterprise sales where a polished video signals organizational investment, and complex products where the real UI is genuinely confusing and needs visual abstraction to communicate the concept.
Where self-recorded demos win: product-led growth, developer tools, B2B SaaS where buyers are evaluating functional capabilities not brand aesthetics, and any product where seeing the actual UI in action is more convincing than seeing a designed version of it.
For most indie-built and early-stage SaaS products, the self-recorded screen demo is the right call for the first two years. Not because it’s cheaper (though it is), but because it’s more authentic, faster to update when the product changes, and specific in a way that generic animation rarely is.
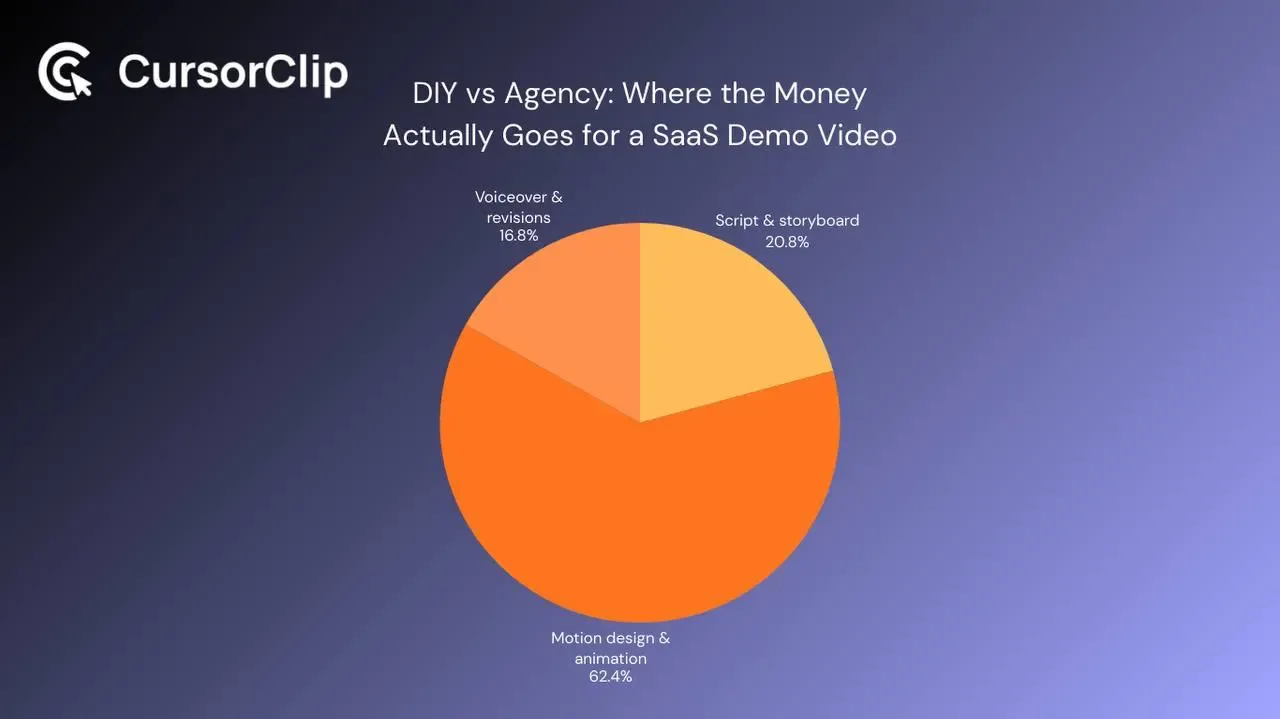
The production cost difference is real. A motion design agency charges between $5,000 and $20,000 for a polished animated SaaS explainer. CursorClip costs $59, one time. A Rode NT-USB Mini costs $99. The total investment for a setup that produces professional-quality screen recordings indefinitely is under $200.
Keeping Your Demo Video Current
This is the part of demo video production that nobody addresses, and it’s where most teams fall behind.
Your product UI will change. A feature you shipped last month may look different by next quarter. A demo video that shows an outdated interface is worse than no demo at all. It creates confusion for visitors who sign up and find the product doesn’t match what they watched.
The teams that keep demo content current have two things in common: they record in one take (no complex editing to redo when something changes) and they treat demo re-recording as part of shipping a significant UI change, not as a separate content project.
With CursorClip’s workflow, record, review the auto-zoom preview, export, re-recording a 75-second demo takes about 25 minutes from setup to export. That’s fast enough to be part of a release process rather than its own project. The absence of a timeline editor means there’s nothing to reconstruct when you re-record.
You may find useful:
Frequently Asked Questions
How long should a SaaS demo video be?
For a landing page hero demo, 60 to 90 seconds. This is the range where Wistia’s engagement data shows above-average viewer retention across B2B software. Under 60 seconds is fine for feature-specific clips or social content. Over 90 seconds is fine for investor demos or detailed walkthroughs where the viewer has opted in to a longer look. The hero demo that a cold visitor sees for the first time should not exceed 90 seconds.
Should my demo video have narration or be silent?
Both work. Silent demos with captions are often better for landing pages because autoplay is almost always muted. Narrated demos are better for investor updates, sales follow-ups, and any context where the viewer has specifically decided to watch. If you’re going to narrate, invest in a proper microphone, the MacBook’s built-in mic creates an impression of low effort that affects how visitors perceive the product.
Do I need a professional video editor to make a SaaS demo video?
No. The reason most self-made demo videos require editing is the zoom problem, without a recorder that handles zoom automatically, you need to manually add zoom keyframes in post-production for every key interaction. CursorClip’s cursor-follow auto-zoom eliminates that editing step. Record, review the preview, export. Most demos are done in one take.
Should I show the full product or just the best feature?
Just the best feature, or more precisely, the one scenario that best answers “why should I care?” for your primary buyer. A demo that tries to show everything your product does shows nothing convincingly. Pick the scenario that produces the most compelling result for the most common use case, and show that. Other features can have their own shorter spotlight videos.
How do I make the demo video autoplay on my website?
Use a native <video> HTML element, not a YouTube or Vimeo iframe, with these attributes: autoplay muted playsinline loop. Autoplay only works with the muted attribute in modern browsers. This combination gives you GIF-like behavior (plays immediately, loops, no click required) with MP4 file sizes (typically 4-10MB for a 60-90 second 1080p recording). Host the MP4 file directly on your server or CDN rather than embedding from a video platform.
What resolution should I record and export at?
Record at 4K if your setup supports it, export at 1080p for web use. Starting from a higher-resolution source gives you more flexibility, and the export quality at 1080p from a 4K source is noticeably better than recording directly at 1080p. For social distribution, most platforms cap at 1080p anyway. CursorClip supports 4K 60fps recording and lets you export at whatever resolution the destination requires.
How quickly can I make my first demo video?
Realistically, two to three hours for a complete first attempt including setup, rehearsal, recording, and export. After you’ve done it once and have your demo account set up, subsequent recordings or re-recordings take 30 to 45 minutes. The time cost drops significantly after the first one because the environment is already prepared and you understand the workflow.
Can I use the same recording for my landing page and my social media?
Use the same source recording but export different versions for different destinations. Your landing page version should be the full 75-90 second MP4. Your social version should be trimmed to 30-45 seconds focusing on the most visually striking 30 seconds. Your email version should be a short GIF thumbnail linked to the hosted full video. CursorClip exports both MP4 and optimized GIFs from the same recording.
The Complete Recording Checklist
The night before a recording session, or thirty minutes before hitting record:
-
Demo account set up with realistic data
-
Application window sized consistently (1280×800 or 1440×900)
-
Do Not Disturb enabled
-
All unrelated applications closed
-
Microphone positioned at 6-8 inches (if narrating)
-
Specific scenario chosen and rehearsed twice
-
Starting state confirmed, product open to where the demo begins
-
CursorClip open with window capture selected
-
One test recording of 10 seconds reviewed and confirmed working
After recording:
-
Auto-zoom preview reviewed once at 1.5× speed
-
Key interactions visible and readable
-
Recording ends on the payoff
-
Exported at 4K source, 1080p web version
-
GIF exported for social/changelog use if needed
-
Landing page embed tested on mobile, video plays without click, UI elements readable
Two hours from now you could have a demo video on your landing page that shows your product working to every visitor who lands there. Not a placeholder screenshot. Not a “watch a demo” link that goes to a 12-minute Zoom recording. A 75-second clip that starts with your product doing something impressive and ends on the result.
That video will work for you every hour of every day, requiring nothing from you after it’s published.
Make it today.
Links, you may find useful:
- https://cursorclip.com/blog/how-we-built-cursor-aware-zoom/
- https://cursorclip.com/blog/record-polished-demos-without-editors/
- https://cursorclip.com/blog/mac-screen-recorder-auto-zoom/
CursorClip is a native macOS screen recorder with cursor-follow auto-zoom, 4K 60fps recording, optimized GIF export, and a $59 one-time license. No subscription, no timeline editor, no cloud account. The demo video workflow described in this guide takes under two hours from zero to published. Try it free →