There are two ways to make a tutorial video on your Mac.
The first one goes like this: you record your screen, drag the file into iMovie or Final Cut, and spend the next 45 minutes scrubbing through a timeline adding zoom keyframes to every button click and menu item. By the time you’re done editing a three-minute tutorial, half your afternoon is gone. You do this once, maybe twice, then quietly stop making tutorials because the time cost never felt worth it.
The second way: you record, watch a 30-second preview, and publish.
Both produce a tutorial video. Only one produces a habit.
This guide walks through the entire workflow: planning, environment setup, the zoom issue that tanks most recordings, audio, and getting the thing out the door fast enough that you’ll actually do it again next week.
Why Most Tutorial Videos Are Bad Before Anyone Watches Them
The same four problems show up in almost every bad tutorial video. They’re worth naming because they’re all fixable, and fixing them doesn’t require expensive software or video editing skills.
The first problem is the small-screen issue. A modern Mac display is 1440px wide at minimum, often 2560px or more. When you record at full screen and someone watches your tutorial on a 13-inch laptop, the buttons and menus you’re clicking are 12 pixels tall. They cannot read them. The cursor drifts around the UI and the viewer watches without understanding anything. This is the most common problem and it’s the one most people never address.
The second problem is speed. You know your product. You’ve used it hundreds of times. When you record, you navigate at the speed of someone who knows exactly where everything is. New users process each step far more slowly than that. The gap between how fast you move and how fast they can follow is where most tutorials lose people.
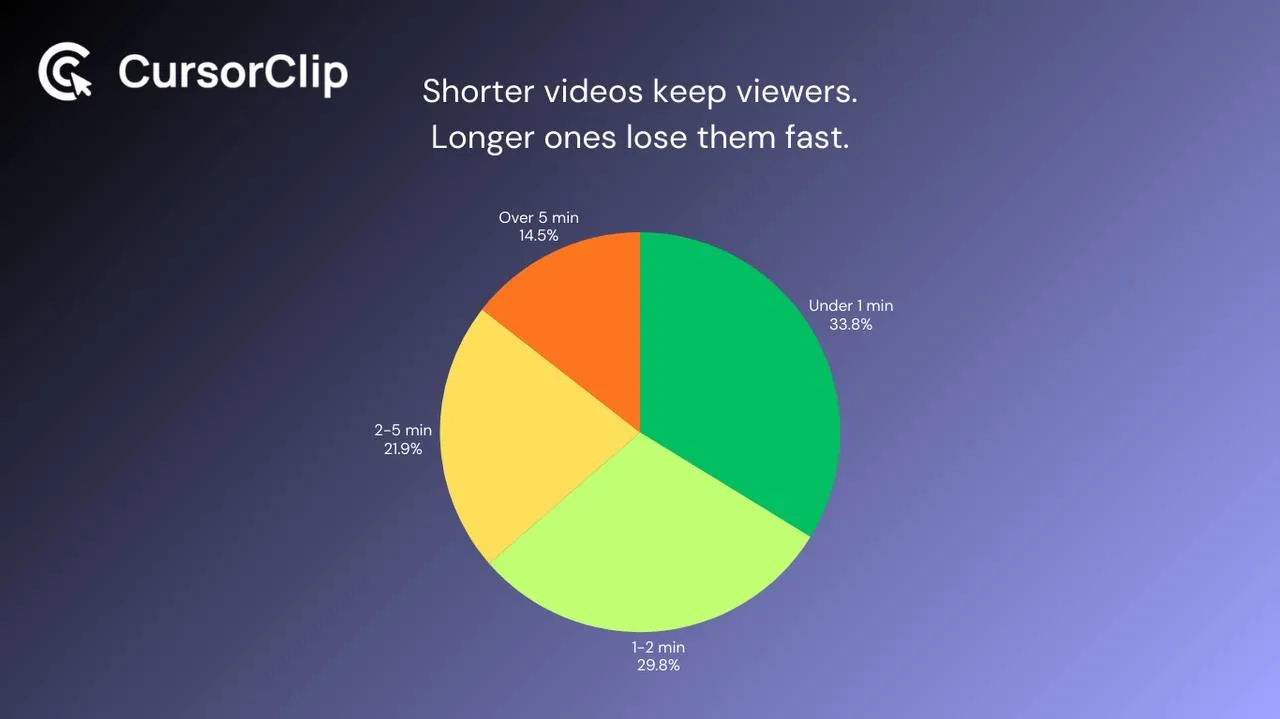
The third problem is scope. A 10-minute tutorial covering every feature of your product is not a tutorial. It’s a documentation page with your face on it. According to Wistia’s State of Video report, engagement drops sharply after the two-minute mark. People click on a tutorial because they have one specific thing they need to do. Show them that thing and stop.
The fourth problem is the microphone. The MacBook’s built-in mic captures keyboard noise, room reverb, and every sound within 10 feet. It makes recordings sound like a video call from 2011. Viewers don’t consciously notice bad audio most of the time, but it does affect how much they trust what they’re watching. Research from USC on audiovisual quality found that poor audio quality consistently lowers perceived credibility of video content, even when viewers attribute their discomfort to something else.
Three of these four problems get fixed by habits. The small-screen problem used to require a video editor to fix. It mostly doesn’t anymore.
Step 1: Get Clear Before You Open Anything
The fastest way to waste time making tutorial videos is to hit record without knowing exactly what you’re recording.
You don’t need a script. You need three things settled before you start.
One outcome. Finish this sentence: “After watching this, the viewer can ___.” If you need more than one sentence, the tutorial is covering too much. Split it into two videos. A tutorial that tries to teach someone three things teaches them nothing well.
The shortest path to that outcome. Write down every step a new user has to take. Count them. If you’re above eight steps, look for anything you can cut or combine. Tutorial videos are not documentation. They’re the fastest clear route from problem to result, not a comprehensive map of everything the product can do.
Where to start the recording. Most tutorial videos start two minutes before they should. They show the home screen, the navigation to the relevant section, and the loading state before anything interesting happens. Start as close to the point of value as possible. If the tutorial is about connecting a custom domain, start with the domain settings screen open, not with logging in.
Once those three things are settled, do a single dry run. Not to rehearse lines, but to make sure the sequence is actually as smooth as you think it is. Hesitation looks like uncertainty on screen and uncertainty erodes trust.
Step 2: Set Up the Recording Environment
This step takes ten minutes and most people skip it. The recordings that look visibly amateur almost always skipped it.
Use a demo account. Your personal or production account has years of real data, odd configurations, notification dots everywhere, and whatever state you left it in last Tuesday. It doesn’t look like a new user’s experience and it’s not what you want on screen. Create a clean demo account, fill it with realistic-looking data, and record from there every time.
Record the application window, not your full display. Almost every screen recorder on Mac lets you select a specific window rather than capturing your entire screen. If you need the basic macOS controls first, see our guide on how to screen record on Mac or the step-by-step guide to screen capture video on Mac. Do this without exception. Full-screen recordings include your dock, desktop icons, browser tabs, and every other open application. Window capture shows your product and nothing else. The viewer’s attention stays exactly where you need it.
For software teams recording customer-facing demos rather than tutorials, see the dedicated workflow for picking a screen recorder for SaaS demos on Mac.
Set the window to a consistent size. Around 1280×800 or 1440×900 works well for 1080p recordings. Smaller than that and UI text gets soft when the video is scaled up. Larger and you’re recording empty space around the application. Pick one size and use it for every tutorial you make. The consistency across videos makes your library look deliberately produced rather than thrown together.
Enable Do Not Disturb before every session. On macOS: System Settings, then Focus, then Do Not Disturb. One notification banner appearing over your UI mid-recording is enough to make the whole take unusable. This takes five seconds and it has saved probably hundreds of re-recordings for people who made it a habit.
Step 3: Fix the Zoom Problem (This Is the One Most People Miss)
Here’s what happens when you skip this step. You record a clean, well-narrated walkthrough of your product. You watch it back. It looks fine on your 27-inch display. You publish it. A customer watches it on their phone and sends you a support email asking the same question your tutorial was supposed to answer, because they couldn’t read the interface in the video.
The zoom problem is structural. Even with window capture, a typical application window is 1200 to 1400 pixels wide. The interactive elements inside it, buttons, form fields, dropdown menus, are 14 to 20 pixels tall at normal UI scale. When your tutorial plays at video resolution on a smaller screen, those elements are unreadable.
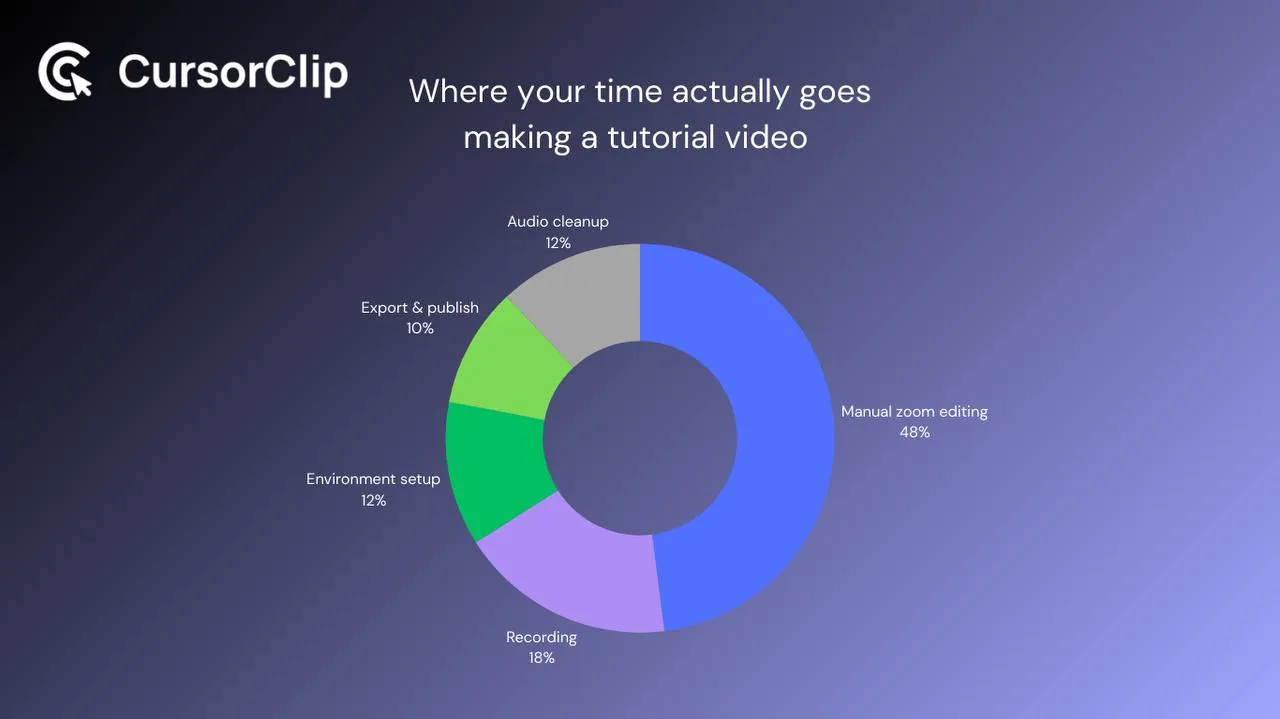
The old solution was manual keyframing in a video editor. You’d scrub through the timeline and add a zoom keyframe at every meaningful click. Position it, set the scale, ease it in, ease it out, move to the next one. For a 90-second tutorial with ten key interactions, that’s 45 to 60 minutes of editing. Every time. For every tutorial. It’s why most teams quietly stop making them.
There are two alternatives that don’t involve a timeline editor.
The first is small-area capture. Instead of recording the full application window, you capture a small cropped region around whatever you’re demonstrating. This works if your tutorial stays in one place. The moment you navigate to a different section of the product, you either need a jump cut or you have to start over. It’s workable for very simple tutorials and fragile for anything complex.
The second is a screen recorder with cursor-follow auto-zoom. CursorClip tracks where your cursor is during the recording and applies smooth zoom and pan that follows each interaction. As you click through menus, open modals, or navigate between sections, the zoom follows automatically. The output looks like someone spent an hour adding zoom keyframes in Final Cut. It took zero additional time because it happened during the recording itself.
The time difference is real. A tutorial that used to take 90 minutes to record and edit now takes 15 to 20 minutes to record and review. That’s not a small improvement. That’s the threshold between tutorial-making being a sustainable regular activity and being something you do once in a while when you have a full afternoon free.
Step 4: Audio That Doesn’t Make People Trust You Less
Audio quality matters more than most people expect, and the reason is slightly counterintuitive. Viewers don’t usually think “this audio sounds bad.” They think “something about this video feels low-effort” and they can’t tell you why. Bad audio creates a general sense that the product or the presenter doesn’t take things seriously. Research on video credibility perception consistently backs this up, even when test subjects are told to focus on visual content only.
You do not need a recording studio. You need two things.
A microphone closer to your mouth than the one built into your Mac. The built-in mic is designed to pick up audio from wherever you are in a room, which means it also picks up everything else in the room. A directional USB microphone at six to eight inches from your mouth changes the entire character of your audio. The Rode NT-USB Mini is around $99 and sounds clearly professional. The Elgato Wave:3 is similar in price and has a hardware mute button that’s genuinely useful mid-recording. If you’re not ready to spend $100, AirPods used at normal wearing position are a significant step up from the MacBook mic and cost nothing extra if you already own them.
A room that doesn’t have hard parallel surfaces. The hollow, distant sound in most bad tutorial audio comes from sound bouncing between bare walls before reaching the microphone. Carpet, furniture, bookshelves, and curtains all break up reflections. Recording in a walk-in closet full of clothes sounds ridiculous but actually works extremely well acoustically.
One note on narration style: talk about what the action means, not what you’re doing. “Now I’ll click the settings icon” describes what’s visible on screen, which adds nothing. “This is where we configure how often the reports get sent” explains the purpose of the action, which is what the viewer actually needs to know. The screen shows the what. The narration explains the why.
On silent tutorials. They work, and sometimes they work better. For feature announcements, changelog clips, and short documentation GIFs, a clean silent recording with well-placed auto-zoom tells the story without narration. The cursor movement itself becomes directional when the zoom is doing its job. If your audience is technical and the workflow is visually obvious, silent is often faster to produce and far easier to update when the UI changes six months from now.
Step 5: Record in One Take
With a clean environment, a rehearsed sequence, and auto-zoom handling the visual presentation, most tutorials should be done in one take. Here is what that looks like in practice.
Open CursorClip, select the application window rather than full screen, and start recording. Before each key click, let your cursor rest on the target element for a full second. This gives the auto-zoom time to settle, and it gives viewers time to find the element on screen before you interact with it. That pause, practiced consistently, eliminates almost all of the “wait, where did they click?” confusion that makes tutorial videos frustrating to follow.
Move at about 70% of your normal navigation speed. You know where everything is. The viewer doesn’t. What feels slow to you reads as clear and deliberate on screen.
Do not stop recording for small mistakes. If you stumble over a word, take a breath and restate the sentence. If you navigate somewhere slightly wrong, correct it naturally and keep going. The only reason to stop is if you’ve made an error so significant that the tutorial flow no longer makes sense. Minor verbal stumbles in tutorial videos are generally invisible to viewers, or if noticeable, make the presenter sound like an actual person rather than a corporate voiceover. Both outcomes are fine.
End on the result. The final frame before you stop recording should be the finished state: the completed action, the output file, the result dashboard, whatever the viewer was working toward. Do not end on a navigation click back to the home screen. End on the payoff.
Step 6: Review and Export
After stopping the recording, CursorClip shows you the auto-zoom preview immediately. Watch it once at 1.5x speed. The only question you’re asking yourself is whether the key interactions come through clearly: can you see what’s being clicked on, and does the flow make sense to someone who has never used this product before?
If yes, you’re done with production.
For export format, match to where the tutorial is going:
| Destination | Format | Settings | Notes |
|---|---|---|---|
| Help docs / knowledge base | MP4 | 1080p H.264 | Native <video> embed, no click required |
| Website / landing page | MP4 | 1080p | Use autoplay muted playsinline loop in HTML |
| Email sequence | Animated GIF thumbnail | Short, 5 to 8 frames | Most clients block video autoplay |
| YouTube | MP4 | 4K where possible | YouTube recompresses heavily; start higher |
| Twitter / X | MP4 | Under 512MB, under 2:20 | Trim to core 30 to 45 seconds |
| Slack / team updates | GIF | Short optimized loop | Plays inline, no click needed |
| Notion / Confluence | MP4 or embed | 1080p | Both platforms support native embeds |
| Changelog | GIF or short MP4 | 10 to 15 seconds | Show only the new interaction |
On GIF versus MP4 for documentation specifically: GIFs play anywhere without a click and work inside Markdown files, email threads, and documentation tools that don’t support video. The tradeoff is file size. A 15-second GIF at decent quality typically runs 5 to 20MB. The same clip as an MP4 is usually under 2MB. Where you can use an MP4 with autoplay muted playsinline loop in HTML, that’s almost always the better call. Use GIF for contexts where MP4 support isn’t reliable.
CursorClip exports both formats natively, so there’s no conversion step between the recording and whatever destination the video is going to.
What a Sensible Tutorial Library Looks Like
A good tutorial library is not 50 videos. It’s around 12 to 15 recordings that cover the moments where users actually get stuck, organized well enough that someone can find the one they need in under ten seconds.
For a typical SaaS product, the core library covers four types of content.
A getting-started video, two to three minutes long, that covers the complete first-session experience from signup to first meaningful action. This lives at the top of your help center and in the first email of your onboarding sequence.
A core-workflow video, around 90 seconds, showing the thing that 80% of your users do 80% of the time. Clean, fast, ends on the result.
Feature spotlight videos, around 60 seconds each, one per significant capability. These belong in your help docs, your changelog entries, and feature announcement emails. A 60-second recording of a new feature converts more readers than three paragraphs describing it.
Troubleshooting videos, 30 to 45 seconds each, answering the three or four things your support team gets asked most often. Recording each one once eliminates versions of that support ticket for years.
The mistake most teams make is trying to document everything before they’ve documented anything. Start with the core workflow and your top three support questions. That covers the majority of users’ actual needs and gives you a foundation to build on when time allows.
Keeping Tutorials Up to Date When Your Product Changes
This is the part no tutorial guide ever talks about, and it’s where a lot of the long-term cost of tutorial production lives.
If a UI update means re-recording from scratch every time, your tutorial library becomes a maintenance burden. You either keep outdated recordings up because re-recording takes too long, or you spend ongoing time updating them. Neither situation is good.
Three habits make this manageable.
Record one topic per video. A “complete guide” covering five features in one recording means re-recording the whole thing when any single feature changes. Short, single-subject videos can be updated individually without touching anything else in the library.
Document your demo account state. When you record a tutorial, take a screenshot of the starting state and save it somewhere obvious. When you need to re-record six months later, you’re starting from the same point rather than reconstructing it from memory.
Record in one take whenever you can. The more a recording depends on specific timing, narration synced to precise moments, or manual editing, the more work any update requires. A recording that went from capture to export with auto-zoom can be re-recorded in 15 minutes. One that was carefully edited takes proportionally longer to redo.
With CursorClip’s workflow, re-recording a tutorial when something changes takes about as long as the original recording did. There are no editing steps to redo because there were no editing steps in the first place.
You may find useful:
Frequently Asked Questions
Do I need to narrate tutorial videos or can they be silent?
Both work. The right choice depends on the content and where it’s going. Narration helps when the workflow has non-obvious steps or when the purpose of an action isn’t clear from watching it. Silent tutorials work well for visually self-explanatory flows, documentation GIFs, social posts, and anything where sound might be off. If you go silent, the zoom behavior matters more because cursor movement and framing have to carry all of the communication load. Auto-zoom handles that well when set up correctly.
What’s the ideal length for a tutorial video?
For help docs and onboarding: 60 to 90 seconds for a single-topic tutorial. Two to three minutes for a full getting-started walkthrough. For feature announcements and changelog: 15 to 30 seconds. Wistia’s engagement data shows that videos under two minutes retain over 70% of viewers to completion. Videos in the five to ten minute range retain around 50%. Shorter is almost always the right instinct.
Should I use 1080p or 4K for recording?
Record at the highest resolution your setup supports and export down to what the destination needs. YouTube and dedicated video platforms benefit from 4K source files because they apply their own compression on upload. For help docs, website embeds, and email thumbnails, 1080p is more than enough. The practical consideration with CursorClip is that 4K recording is available and exports cleanly, so there’s no reason not to record at 4K if your Mac supports it. You can always export a 1080p version from a 4K source; you can’t go the other direction.
How do I record system audio on Mac without extra software?
It depends on your macOS version. On macOS 27 or later, the built-in Screenshot toolbar (Shift-Command-5) can record it: open Options and choose Include System Audio (Apple Support, published 14 September 2026, checked 6 October 2026). On macOS 26 and earlier, Apple’s built-in tools record your microphone only, which is why screen recorders handle system audio themselves. CursorClip captures system audio natively on macOS 13.5 or later without requiring a third-party virtual audio driver like BlackHole or Loopback. If you’re using a different recorder and need system audio, BlackHole is free and works well. Loopback is a paid app and more powerful, and it’s the kind of tool that becomes essential if you do any kind of complex audio routing. For a beginner-friendly setup walkthrough, see how to screen record on a Mac with audio.
What do I do if my recording is too large to embed?
Compress it with Handbrake before uploading. It’s free, runs natively on Apple Silicon, and the H.264 1080p30 preset brings most recordings to well under 10MB without visible quality loss. For GIFs that are too large, run them through Squoosh or convert them to MP4 and use the autoplay muted playsinline loop approach on your website. A 30-second autoplay MP4 loads faster than an equivalent GIF and looks better at the same file size.
How many takes should I expect to need?
One or two is normal with a rehearsed flow and a clean environment. More than three usually means the flow itself is unclear rather than the recording execution being wrong. If you’re on your fifth take, stop recording and go back to the planning step. Simplify the sequence, remove a step, and try again. The recordings that come out cleanest are usually the ones where the flow was so obvious during the dry run that the recording almost felt boring.
My product changes frequently. Is it worth building a tutorial library at all?
Yes, with one caveat: record narrowly. One feature per video. The more specific each recording is, the less often it needs to be updated and the faster each update takes. A “full product walkthrough” gets stale after one significant UI update. A 60-second video showing how to add a team member gets stale only when that specific flow changes. Build the library out of small, focused recordings and the maintenance load stays manageable.
Can I use tutorial videos in email sequences?
Not directly, since most email clients either block autoplay or don’t support video embeds at all. The standard approach is to use an animated GIF thumbnail with a play button overlay, linked to the hosted video. This gives email a video-like first impression while handling the playback in a browser or video host where it works reliably. For the GIF thumbnail, a three to five second loop from the most visually compelling moment in the tutorial converts better than a static screenshot.
The 45-Minute First Tutorial
Pick one thing your product does that more users should know about. Not the most complex thing. Something with two or three steps that produces a clear, visible result.
Then do exactly this:
-
Set up a clean demo account with realistic data (10 minutes)
-
Write down the outcome, the steps, and where to start the recording (5 minutes)
-
Do one dry run from start to finish (3 minutes)
-
Open CursorClip, select your product window, turn on Do Not Disturb, and record (10 minutes max)
-
Watch the auto-zoom preview once (2 minutes)
-
Export and put it somewhere people will find it, like your help docs, a Notion page, or a changelog entry (5 minutes)
That’s 35 to 40 minutes from nothing to a published tutorial. After the first one, the next takes 20 because the environment is already set up.
The teams that build strong tutorial libraries are not the ones who block off a “tutorial day” every quarter. They’re the ones who made each individual recording cheap enough in time that it happens as a natural part of shipping something.
Make the first one cost 40 minutes. The rest follow from there.
Links, you may find useful:
- https://cursorclip.com/blog/camtasia-alternatives-mac/
- https://cursorclip.com/blog/cursorclip-vs-camtasia/
- https://cursorclip.com/blog/cursorclip-vs-screencharm/
CursorClip is a native macOS screen recorder with cursor-follow auto-zoom, MP4 export up to 4K at 60 fps, and GIF export for recordings under 10 minutes. Recording and editing are free, with no account. A lifetime license to export is $70.