What this guide covers: How to screen record videos on Mac using the built-in Screenshot toolbar, QuickTime Player, and third-party tools. You will also learn how to record screen video on mac with audio, how to record coding tutorials with auto zoom on mac, and when to upgrade to a smarter recording tool.
How to Screen Record Videos on Mac: Quick Answer
To screen record videos on Mac, press Shift + Command + 5 on your keyboard to open the Screenshot toolbar. Select whether you want to record the entire screen or a selected portion of the screen, then click the record button to start recording. When done, click the stop icon in the menu bar. The recording will be saved to your desktop by default.
That is the fastest path for a basic screen recording on your mac. Keep reading for step-by-step walkthroughs, audio tips, and a smarter tool if you need polished results.
1. How to Screen Record Videos on Mac Using the Built-In Screenshot Toolbar
Mac’s built-in screen capture tool is the fastest way to begin capturing your screen without installing anything. Available since macOS Mojave, it puts every recording and screenshot option in one place.
Step 1: Open the Screenshot toolbar Press Shift + Command + 5 on your keyboard. A small toolbar appears at the bottom of your desktop with icons for screenshots and screen recording.
Step 2: Choose your recording mode You will see two screen recording icons in the toolbar:
- Record the entire screen (the full display)
- Record a selected portion of the screen (you drag to define the area)
Click the icon that matches what you want to capture.
Step 3: Set your options Click Options on the screenshot toolbar to configure:
- Where the recording will be saved (the default is saved to your desktop)
- Whether to include a microphone for audio recording
- On macOS 27 or later, whether to include system audio (choose Include System Audio)
- Whether to show the mouse cursor
- A timer delay before starting your recording
Step 4: Start recording Click the Record button on the right side of the toolbar. If you chose a selected portion, drag to select the area first, then click Start Recording.
Step 5: Stop recording Click the stop recording icon in the menu bar at the top right corner of your screen, or press Command + Control + Esc to stop. The video file appears as a thumbnail in the corner of your screen before it is saved to the location you specified.
Tip: Screenshots are saved as PNG files while screen recordings save as MOV files by default. You can change the capture format in the Options dropdown before you start.
2. How to Record Screen Video on Mac Using QuickTime Player
QuickTime Player is Mac’s built-in media app and it doubles as a capable screen recorder. It has been available on every Mac for years and requires no download.
Step 1: Open QuickTime Player Open QuickTime Player from your Applications folder or use Spotlight search (Command + Space, then type “QuickTime”).
Step 2: Start a new screen recording Click File in the menu bar, then select New Screen Recording from the dropdown. The recording controls will appear.
Step 3: Configure audio settings Before you click record, click the small arrow next to the record button. This lets you:
- Choose a microphone to record your voice
- Enable or disable mouse click highlights
- Note: this window offers a microphone only. If File > New Screen Recording opens the Screenshot toolbar instead, use the steps in section 1; on macOS 27 or later that toolbar can include system audio
Step 4: Click record Click the Record button. You will be prompted to either click anywhere to record the entire screen, or drag to record a portion of the screen.
Step 5: Stop recording and save To stop recording, click the stop icon in the menu bar. QuickTime opens the recording automatically in a new window. Go to File > Save to choose where your recording will be saved. If you do not save it, the file is saved to the folder you last used.
Limitation: QuickTime’s own recording window records audio only from your microphone. Recording system audio (app sounds, music, video playback) needs the Screenshot toolbar on macOS 27 or later, or a different app on older versions.
3. How to Record Coding Tutorials with Auto Zoom on Mac Using CursorClip
The built-in methods work well for basic captures, but they fall short when you want to record coding tutorials with auto zoom on mac. For professional screen recordings that look edited without any timeline work, CursorClip is the standout tool.
CursorClip is a native macOS screen recorder that automatically zooms to where your cursor clicks. This is especially useful for tutorial creators, developers, and anyone who wants to record coding tutorials where the viewer needs to follow along closely.
Step 1: Download and install CursorClip Download CursorClip from cursorclip.com. Follow the install guide, open the downloaded DMG file, drag the app icon to your Applications folder, and launch it.
Step 2: Grant permissions On first launch, CursorClip will ask for screen recording access, accessibility access, microphone access, and camera access. Grant each permission in System Settings. These allow the app to capture your screen and follow your cursor automatically.
Step 3: Set your recording preset CursorClip lets you configure reusable presets so your webcam overlays, zoom behavior, and export settings stay consistent across recordings. Select a preset before you start recording.
Step 4: Start recording Click the record button in the CursorClip control bar. The app begins capturing your screen and automatically applies smooth zoom on every click, with pans and crossfades added without any manual keyframing.
Step 5: Export your video When done, stop recording and open the editor. Click the export button to output your file. CursorClip exports watermark-free 4K/60fps video without the need to touch a timeline. The recording will be saved to the location you specified or the default folder.
Why this matters for coding tutorials: When you are recording a coding tutorial, viewers need to see exactly where you are clicking and what code you are writing. The auto zoom follows your cursor and keeps the frame tight on the relevant part of the screen. You do not have to manually zoom in post-production, which eliminates hours of video editing for longer tutorials.
4. How to Record the Entire Screen vs. a Selected Portion
Choosing between recording the entire screen and a selected portion of the screen depends on what you are capturing.
Record the entire screen when:
- You are demonstrating a workflow that spans multiple apps
- You want the viewer to see the full desktop context
- You are recording for a mac screen walkthrough or onboarding video
Record a selected portion when:
- You only want to capture one app or window
- You are recording a coding tutorial focused on a specific panel
- You want to hide other parts of your desktop
With the built-in screenshot toolbar and QuickTime Player, you click once to record the entire screen or drag a box to define the selected portion. CursorClip and other tools offer similar options within their recording setup.
5. How to Screen Record on Mac with Audio
Recording screen with audio is straightforward for microphone input but more complex for system audio (internal sounds your Mac is playing).
To record your voice: In the Screenshot toolbar, click Options and select your microphone under the Microphone section. In QuickTime, click the arrow next to the record button and choose your microphone input.
To record system audio: On macOS 27 or later, open the Screenshot toolbar (Shift + Command + 5), click Options and choose Include System Audio (Apple Support, published 14 September 2026, checked 6 October 2026). On macOS 26 and earlier, the built-in recorder and QuickTime do not capture system audio without a third-party virtual audio driver. On those versions, or when you want more than a raw clip, you have two options:
- CursorClip: Records system audio and microphone by default on macOS 13.5 or later, with no driver installation required.
- OBS Studio: Free and open-source, with full audio routing control for system audio. OBS has a steeper setup curve but is completely free.
For step-by-step routes on every macOS version, a comparison of seven recorders and fixes for silent recordings, see the full guide to Mac screen recording with audio.
6. Third-Party Screen Recorder Options Worth Knowing
The built-in mac screen recording tools are good enough for quick captures. But if you need more, here are the tools worth considering:
CursorClip ($70 one-time): Native macOS app, auto zoom on every cursor click, 4K/60fps export, microphone and system audio capture built in, and a light footprint at about 46 MB installed. Best for product demos, tutorials, and developers who want to record coding tutorials without editing.
OBS Studio (Free): Powerful, cross-platform, and fully free. Best for live streaming and advanced recording setups. OBS has a learning curve and no built-in timeline editor, but it handles system audio well and imposes no recording limits.
Loom (Free to $18/user/month): Best for quick async team video updates. Loom to screen record and share is fast, with automatic sharing links. The free tier caps at 25 videos and 5 minutes each.
Camtasia ($39 to $599 a year in the US): A professional screen recorder and video editor combined. Camtasia is the right pick if you need interactive elements, quizzes, and full timeline video editing in one app. TechSmith’s own store sells it only as a yearly subscription, and Essentials ($179.88 a year) is the cheapest plan without a watermark. The Mac App Store still sells Camtasia 2024 once for $199.99, but TechSmith supports that version only until 31 December 2026. Prices checked 3 October 2026; see the Camtasia pricing breakdown.
For most Mac users who want to learn how to screen record videos with polish and speed, CursorClip wins on value: a one-time payment, no subscription, and results that look edited without opening a timeline.
For SaaS demos, landing-page walkthroughs, and startup product videos, the focused screen recorder for SaaS demos on Mac guide goes deeper on tool choice and workflow.
7. Tips for Better Screen Recordings on Mac
Keep your desktop clean. Before you start recording, remove clutter from your desktop and close apps you do not need. This keeps your screen recording on your mac looking professional.
Use a microphone. Even the MacBook’s built-in microphone is usable, but an external microphone improves clarity significantly. You can select your microphone from the Options menu in the screenshot toolbar.
Check your recording area. If you are recording a selected portion of the screen, drag to define the area carefully before you click start recording. A misaligned capture area is one of the most common mistakes.
Watch your system audio. If you are recording a tutorial with app sounds or video playback, plan for system audio capture in advance. The built-in tools capture it only on macOS 27 or later, with Include System Audio chosen in Options.
Use presets for repeat recordings. If you record often, a tool like CursorClip lets you save a preset so your settings, zoom behavior, and export format stay consistent across every video. For more workflow ideas, browse the CursorClip blog.
Review with a thumbnail. After recording, macOS shows a thumbnail in the corner of your screen. Click it immediately to preview and trim before it auto-saves.
8. Best Export Settings for Screen Recordings
The right export format depends on where the recording will be used.
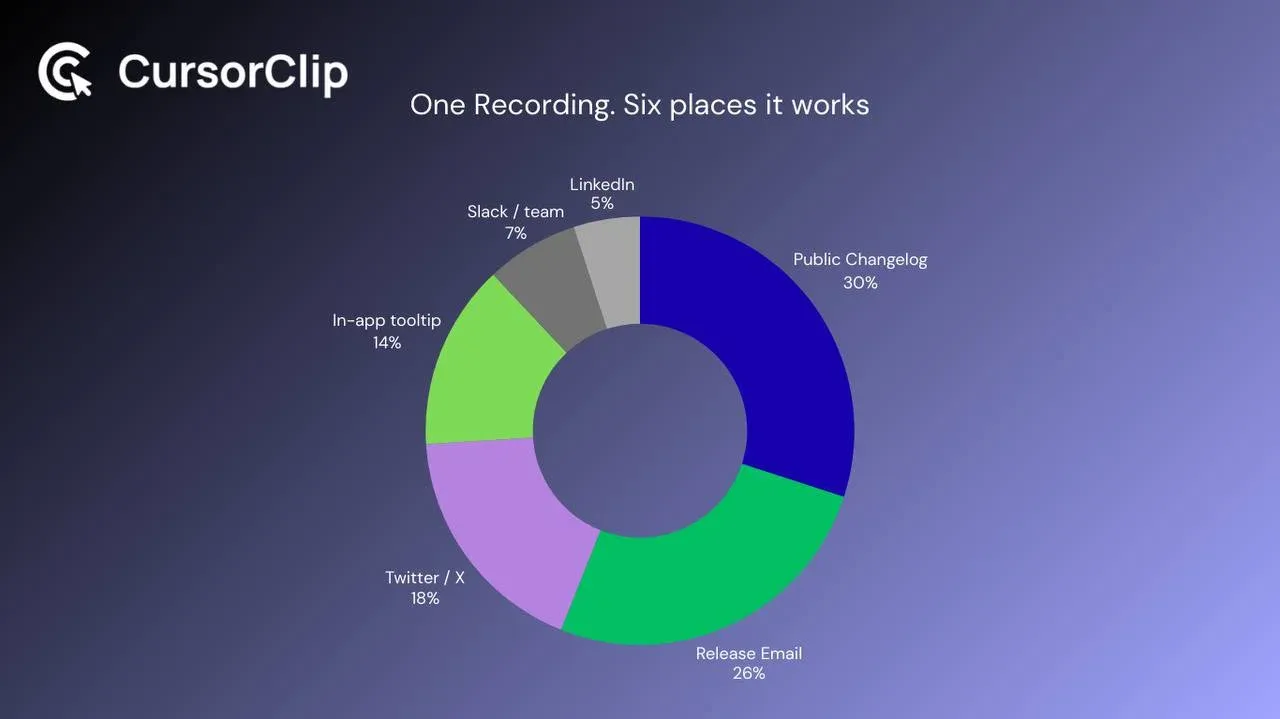
Use MP4 for websites, landing pages, tutorials, YouTube videos, product demos, and customer onboarding. MP4 gives you strong quality with manageable file sizes.
Use GIF for Slack, Notion, documentation, changelogs, and GitHub issues. GIFs work best for short, silent demonstrations that need to autoplay.
Resolution recommendations: 1080p is a safe default, 1440p offers extra clarity, and 4K gives maximum flexibility if your Mac supports it. If you plan to crop, zoom, or reuse the video later, recording at a higher resolution helps preserve sharpness.
9. Troubleshooting Common Recording Problems
No audio in the recording. Check microphone permissions in System Settings, confirm the right input is selected in the recording tool’s options, and verify any external audio routing. Remember that the built-in tools capture system audio only on macOS 27 or later, and only when Include System Audio is chosen in Options.
Recording lag or dropped frames. Close heavy applications before recording. This matters most on older MacBooks and when recording at 4K.
Export fails or hangs. Check available storage first, then try a smaller capture area or lower resolution. Long recordings need significant free disk space during export.
Conclusion: Upgrade Your Screen Recording Workflow
Mac gives you solid built-in tools to screen record videos at no cost. The Screenshot toolbar and QuickTime Player handle basic screen recording well for quick captures, bug reports, and simple walkthroughs.
But if you want to record screen video on mac that looks polished, or if you need to record coding tutorials with auto zoom on mac without spending hours in a video editor, the built-in tools are not enough.
CursorClip is built for exactly that. It is a native macOS screen recorder that adds automatic zoom, smooth pans, system audio capture, and 4K export, all without opening a timeline. Developers, founders, and tutorial creators use it to ship professional screen recordings in a fraction of the time.
Right now, CursorClip is available for a one-time lifetime deal. No subscriptions, no recurring fees. You pay once, activate your license, and record polished demos forever.
Grab the CursorClip Lifetime Deal at cursorclip.com and start recording professional screen recordings today.
Frequently Asked Questions
How do I screen record on a MacBook? Press Shift + Command + 5 to open the screenshot toolbar. Choose to record the entire screen or a selected portion, click the record button, and stop recording by clicking the stop icon in the menu bar. This works on all MacBook models running macOS Mojave or later.
How do I record screen video on Mac with audio? Choose your microphone in the Screenshot toolbar’s Options (Shift-Command-5). For your Mac’s own sound, macOS 27 or later adds Include System Audio to the same menu. On macOS 26 and earlier, use a recorder such as CursorClip or OBS Studio. Our guide on how to screen record on a Mac with audio covers each macOS version and the no-sound fixes.
Where are screen recordings saved on Mac? By default, recordings are saved to your desktop. You can change this in the Options menu of the screenshot toolbar before starting your recording. QuickTime recordings are saved to the folder you choose at export. Recordings are saved as MOV files by default.
Can I screen record on Mac without audio? Yes. In the Screenshot toolbar, click Options and set Microphone to None. This records your screen without audio. In QuickTime, simply do not select a microphone source before you click record.
What is the best free screen recorder for Mac? The built-in macOS Screenshot toolbar is the best free option for quick recordings with zero setup. OBS Studio is the best free screen recorder for Mac if you need more power, system audio, and unlimited recording time.
How do I record coding tutorials with auto zoom on Mac? Use CursorClip, which automatically zooms and pans to your cursor on every click. This creates polished coding tutorials without any manual video editing. It is a native macOS app with a one-time $70 price and supports 4K/60fps export.
Does Mac have a built-in screen recorder? Yes. Mac’s built-in screen recorder is accessible via the Screenshot toolbar (Shift + Command + 5) or through QuickTime Player (File > New Screen Recording). Both are free and require no installation.
Can I use keyboard shortcuts to screen record on Mac? Yes. Press Shift + Command + 5 to open the Screenshot toolbar. You can also press Shift + Command + 3 for a full-screen screenshot or Shift + Command + 4 to capture a screenshot of a selected portion.
How do I stop recording on Mac? Click the stop recording icon in the menu bar at the top right corner of your screen. You can also press Command + Control + Esc to stop recording from keyboard shortcuts.
Does QuickTime Player record internal audio on Mac? Not in QuickTime’s own recording window, which offers a microphone only. On current macOS, QuickTime’s File > New Screen Recording opens the Screenshot toolbar, and on macOS 27 or later its Options include Include System Audio (Apple Support article 102618, published 14 September 2026, checked 6 October 2026). On macOS 26 and earlier, system audio needs a third-party virtual audio driver, or a recorder such as CursorClip or OBS Studio.