The standard advice for making a product explainer video is to hire an animation studio, spend somewhere between $5,000 and $15,000, wait six weeks, and get back a polished two-minute cartoon of your product.
Here’s the thing nobody tells you: that cartoon is often less convincing than just showing the product.
When someone watches an animated explainer, they’re watching a designer’s impression of what using your software might feel like. When they watch a clean screen recording of the actual product solving a real problem, they’re watching the product. One is a promise. The other is proof. For software with a well-designed UI, proof wins, because the viewer leaves with an accurate mental model of what they’re actually signing up for.
This guide is about making that second type. The kind that shows your real product, looks professionally edited, and doesn’t require an animation budget or a video editor afterward.
What a Product Explainer Video Is (and Isn’t)
“Explainer video” gets used to describe a lot of things, so it’s worth being clear about what it actually means and how it’s different from other product videos you might make.
An explainer answers one question: what does this do and why should I care? It’s for people who have never seen your product before. It lives on your homepage, in your pitch deck, in cold outreach emails, and in the first thing someone sees after signing up. Its entire job is to create understanding and desire in under 90 seconds, before the viewer has made any commitment and while they still have a browser tab open to your competitor.
This is different from other types of product video:
- A tutorial video teaches existing users how to do something specific. Those viewers already want to use the product
- A demo video shows a feature or workflow in detail. Those viewers are actively evaluating whether it fits their needs
- A feature announcement shows what’s new in a recent release. That audience already uses and understands the product
- An explainer is for the complete stranger who just heard about you and has about ten seconds of patience
The last one is the hardest to make well, because you have the least goodwill from the viewer and the most to communicate.
Why Screen Recording Often Beats Animation for Software Products
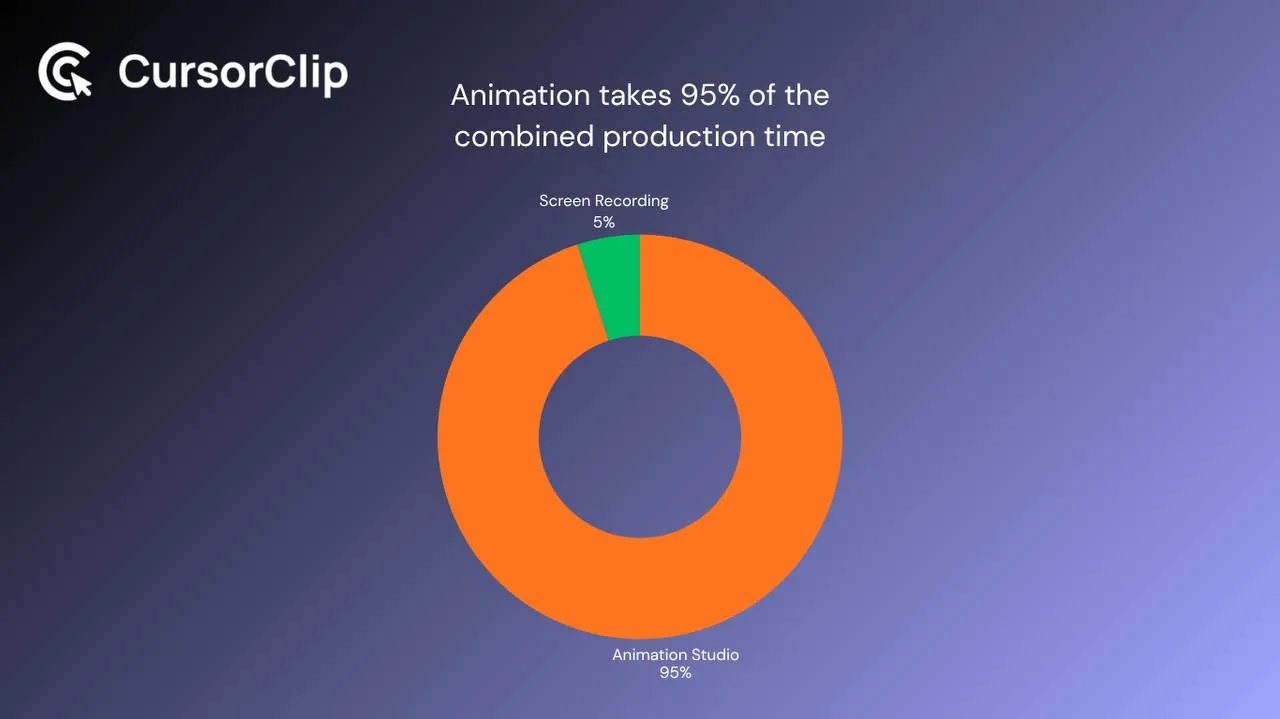
Animation dominated product explainer videos for years because a lot of software UIs were genuinely hard to show on video: complex, visually dense, not something you’d want a prospect staring at for 90 seconds. An illustrated version could simplify, idealize, and make the product look more approachable than the real interface.
That’s less relevant now. Most modern SaaS products are well-designed, clean, and genuinely worth showing. And showing the real interface has two advantages animation can’t match.
The first is authenticity. A screen recording is evidence that your product exists and works. An animation is a promise about what it might be like. When someone is deciding whether to sign up for a free trial, evidence lands differently than a promise. Wyzowl’s 2024 Video Marketing Report found that 89% of people say watching a video convinced them to buy a product, and a big part of why video works is that it shows rather than tells.
The second is accuracy. When someone watches your screen recording and then opens the product, the interface matches what they watched. When they watch your animation and then open the product, there’s a gap. That gap creates friction. Friction becomes churn.
If your UI is early-stage, genuinely complex, or hard to understand without context, animation’s ability to simplify is a real advantage. But for most software products with a designed, functional interface, screen recording wins on:
- Authenticity. Shows the real product, not a representation of it
- Accuracy. Sets correct expectations before the viewer signs up
- Speed. An afternoon to record versus six weeks for animation
- Updateability. Re-record in 20 minutes when the UI changes
The Structure That Makes Explainer Videos Work
The structure that makes a good explainer work is the same whether you’re using animation or screen recording. Here’s how it breaks down:
| Seconds | Job | What happens |
|---|---|---|
| 0 to 5 | Hook | Name the problem or show the payoff. No intro, no logo |
| 5 to 55 | Demonstration | The product solving that problem, shown clearly |
| 55 to 75 | Result | The outcome, what the viewer gets by using this |
| 75 to 90 | CTA | One clear next step. Try it, sign up, learn more |
The first five seconds are the whole battle. Most explainer videos open with a logo animation or a founder saying “hi, we’re building [product].” That’s dead time. The visitor’s only question is “do I care?” and they’re answering it right now. Start with the problem your product solves, stated plainly, or start with the product producing something impressive. No warmup.
The middle section, the demonstration, should show one scenario. Not a feature tour. The single most compelling use case for your primary buyer, shown from the moment the interesting thing starts to the moment the result appears.
And end on the result. The last frame before your CTA is what viewers are thinking about when they decide whether to click. End on the output, the generated thing, the completed task, the finished state, not on a navigation click back to a home screen. The last frame should be the thing the viewer wants.
Why Most Self-Made Explainer Videos Look Worse Than They Should
If screen recordings are so much better than animation, why does the average self-made explainer look worse than something a studio produced for $5,000? Two reasons, and they’re both fixable.
The first is the zoom problem. Most screen recordings show a full application window on a high-resolution Mac display, which means buttons, menus, and form fields that are 14 to 20 pixels tall. When that recording plays at the size it’s actually shown on someone’s screen, those elements are unreadable. The viewer watches a cursor drifting around what looks like a tiny, unreadable interface. It’s not that screen recording is worse than animation. It’s that nobody solved the zoom.
The second is cursor speed. You’ve used your product hundreds of times and navigate it at the speed of familiarity. A first-time viewer needs about three times as long at each step to process what’s happening. Record at your natural pace and viewers lose the thread before the demo is halfway done.
Both problems get solved the same way: a screen recorder that tracks your cursor and automatically zooms into whatever you’re interacting with. CursorClip does this during recording with no post-production. As you move through your product, the recording zooms and pans with you. When you stop, the output looks like someone spent an hour adding zoom keyframes in Final Cut. Nobody did. That’s just how it came out.
For a tool-focused breakdown of recording customer-facing SaaS demos, see the guide to the best screen recorder for SaaS demos on Mac.
How to Set Up and Record Your Explainer
Decide what to show before you open anything. The single workflow that best answers “what does this product do?” for your primary buyer. Not your most impressive feature, not a tour of the interface. One scenario, one result. If your product helps freelancers get paid faster, show the journey from “work done” to “invoice sent and paid.” That’s it.
Set up a demo account with realistic data. Record from a dedicated account that looks like active use, real-looking names, plausible numbers, a state that says “someone has been using this.” Empty dashboards and “Test Project 1” signal prototype. Viewers make subconscious quality judgments from the data they see.
Enable Do Not Disturb. System Settings → Focus → Do Not Disturb. One notification banner mid-recording ruins the take. Five seconds before every session.
Open CursorClip, select your application window rather than full screen, and start recording. Window capture removes everything that isn’t your product, the dock, browser tabs, the desktop. Navigate at about 70% of your natural speed and pause for one full second before each click. That pause lets the auto-zoom settle and gives viewers time to locate the element before you interact with it.
Narrate if the purpose of an action isn’t visually obvious. But describe what the action means, not what you’re doing. “This is where you configure who gets notified when a task changes” is useful narration. “Now I’ll click the settings button” just describes what’s already on screen.
Stop recording the moment the result appears. Don’t navigate away. Watch the auto-zoom preview once, are the interactions readable? If yes, export.
Where Your Explainer Lives and How to Distribute It
Different destinations need different formats. Here’s what actually works for each one:
| Destination | Format | Key setting |
|---|---|---|
| Website homepage | MP4 | autoplay muted playsinline loop plays without a click |
| Feature section | MP4 or GIF | Same autoplay; GIF if you can’t use <video> tag |
| Pitch deck | MP4 | Embedded video slide, test before presenting |
| Cold outreach email | GIF thumbnail links to video | Most email clients block video autoplay |
| Twitter / X | MP4 | Under 512MB, under 2:20 |
| MP4 | Captions strongly recommended, most LinkedIn video plays muted | |
| Product Hunt | MP4 | Under 50MB; first 5 seconds must work without sound |
For your homepage, use a native <video> element with autoplay muted playsinline loop rather than embedding from YouTube or Vimeo. It plays immediately without a click, doesn’t introduce third-party scripts, and loads faster. CursorClip exports MP4 directly. For places where you need a GIF, like email, GitHub, Markdown docs, CursorClip exports those from the same recording.
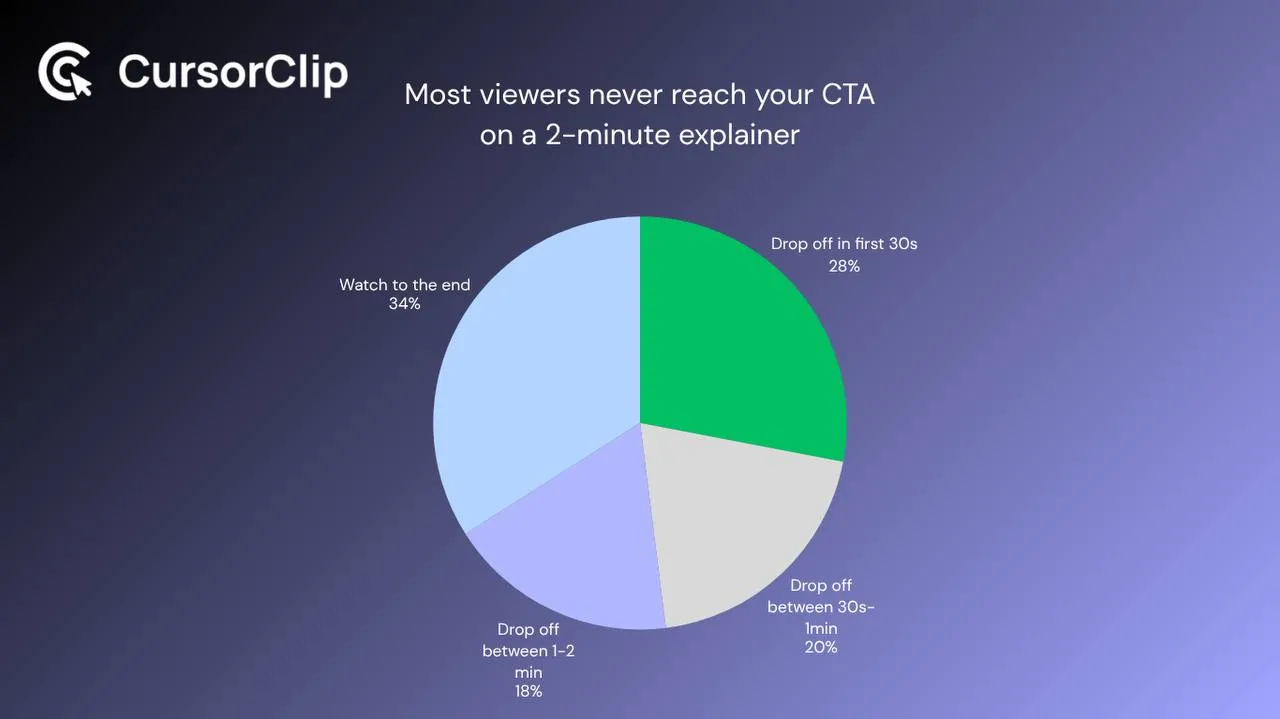
One thing worth saying about all of these: keep it under 90 seconds. Most product teams feel pulled toward showing everything because they know the product well and there’s a lot to show. But the viewer has one question and about 90 seconds of patience. Wyzowl’s research consistently shows engagement drops sharply past two minutes. If you can’t communicate the core value in 90 seconds, you’re probably trying to show three things instead of one.
Frequently Asked Questions
How long should a product explainer video be?
Under 90 seconds for a homepage. Under 60 seconds if the workflow permits it. The shorter the video, the higher the percentage of viewers who reach your CTA, and the end is where the CTA lives. If explaining the value takes more than 90 seconds, ask yourself whether you’re showing one thing or three.
Should I use animation or screen recording?
For software with a clean, functional UI: screen recording with cursor-follow auto-zoom. It’s authentic, sets accurate expectations, and is faster to update when the product changes. For products that are early-stage, deliberately abstract, or hard to understand without significant context: animation is worth considering. For most actively developed SaaS products: screen recording is the stronger call.
Do I need to narrate my explainer?
Not always. A lot of effective explainer videos are silent with captions. On most platforms, like website embeds, LinkedIn, social, autoplay is muted by default, so narration won’t be heard unless someone actively unmutes. Captions at key moments communicate what narration would, without requiring sound. If you do narrate, use a USB microphone close to your face. The MacBook’s built-in mic sounds like a video call and it affects how the whole thing is perceived.
How do I make small UI elements visible in the recording?
This is the zoom problem. CursorClip’s cursor-follow auto-zoom handles it during recording. It tracks your cursor and zooms into whatever you’re interacting with, automatically. No editing, no keyframes. Without that, you’re either recording at full size (elements too small to read) or adding manual zoom in a video editor after the fact (time-consuming and has to be redone every time you re-record).
Can I use the same recording for my homepage and social?
Use the same source recording but export different cuts. Full 75 to 90 seconds for the homepage. A 30 to 45 second version of the most visually striking section for Twitter and LinkedIn. A short GIF for email thumbnails and docs. CursorClip exports both MP4 and GIF from the same recording, record once, export what each destination needs.
What happens when my product UI changes?
Re-record it. With a prepared demo account and a rehearsed workflow, re-recording a 75-second explainer takes about 20 minutes from setup to export. That’s fast enough to make it part of shipping a significant UI update rather than a separate project. The alternative is leaving a homepage video that shows an outdated interface, which creates a mismatch between what people expect and what they find when they sign up. That mismatch costs more in churn than the 20 minutes of re-recording.
What’s the actual difference between an explainer and a demo video?
It comes down to who’s watching and what they need. An explainer is for someone who doesn’t know your product yet, it answers “what is this and why should I care?” A demo is for someone already considering your product, it answers “how does this specific thing work?” Explainers go on your homepage, in pitch decks, and in cold outreach. Demos go in sales follow-ups, help docs, and feature-specific pages.
The Workflow, Start to Finish
- Decide what single scenario to show, one use case, one result for your primary buyer
- Set up a demo account with realistic, plausible-looking data
- Enable Do Not Disturb (System Settings → Focus → Do Not Disturb)
- Open CursorClip and select your application window
- Rehearse the workflow once at recording speed before hitting record
- Hit record and navigate at 70% of your natural speed, pausing one second before each key click
- Narrate only where the purpose isn’t visually obvious, describe meaning, not actions
- Stop recording the moment the result appears
- Watch the auto-zoom preview once, check that interactions are readable
- Export as MP4 for website and social, GIF for email and docs
First time: 90 minutes to two hours. After that, each re-recording takes about 20.
That’s faster than writing the brief for an animation agency.
If you’re also working on other video formats, these guides cover related ground: how to make a SaaS demo video, how to make tutorial videos on Mac, and how to make a feature announcement video.