Somewhere along the way, making a product video became synonymous with video editing. Record something, drag it into a timeline, add zoom effects, trim the awkward pauses, adjust the audio levels, export, realize the zoom was wrong, fix the zoom, export again.
That’s not making a video. That’s doing a second job.
The editing session exists to fix problems created during recording: blurry UI elements nobody can read, a cursor that moves too fast to follow, awkward transitions that need smoothing. Take away those problems at the source and the editing session has nothing to do.
That’s the actual unlock. Not better editing software. Smarter recording.
Why Most Product Videos Need Editing (and Why Yours Doesn’t Have To)
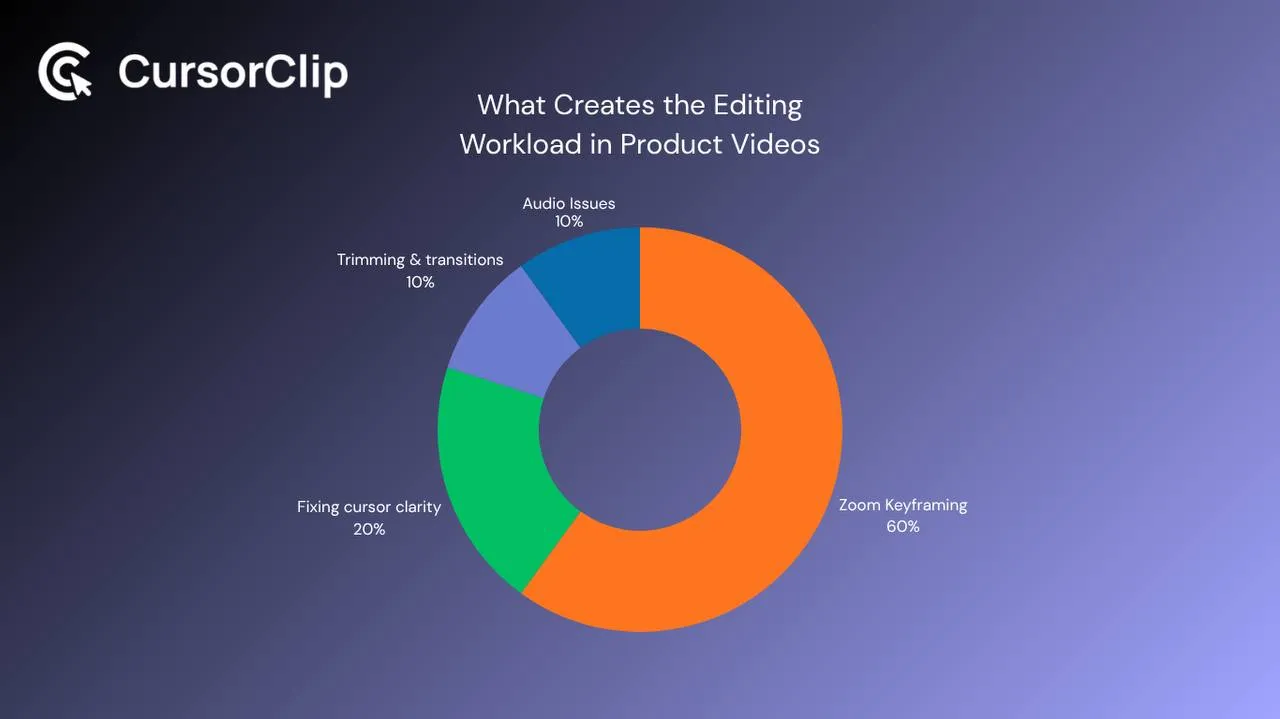
Every minute spent in a video editor after recording a product demo is a minute spent correcting something that could have been right the first time. Understanding what creates the editing workload in the first place shows exactly where to cut it.
The zoom problem accounts for most of the editing time. Record a screen on a modern Mac and you’re capturing a display that’s 1440 or 2560 pixels wide. Inside your application window are menus, buttons, dropdowns, and form fields that are 14 to 20 pixels tall at normal scale. When the video plays at the size it’s displayed, in a tweet, in a landing page section, on a phone, those elements are unreadable. The traditional fix is scrubbing through the timeline and adding a zoom keyframe at every key interaction. For a 90-second product video with 15 clicks, that’s an hour of editing work. Every time. For every recording.
Cursor speed creates confusion that editing tries to solve. Recorded at your natural navigation pace, a cursor that moves across a 1440-pixel interface in two seconds is impossible for a first-time viewer to track. Editors try to compensate with zoom and slow-motion effects. The real fix is slowing down during recording, not after.
Audio issues are what remain after video editing is done. Keyboard noise, room echo, and the built-in MacBook microphone’s tendency to capture everything within ten feet are audio problems. They can’t be fixed in a video editor. They require the right equipment or the right room.
The zoom and cursor problems are the big ones. And they can both be solved before you record a single frame.
The Tool That Eliminates the Editing Session
A screen recorder with cursor-follow auto-zoom makes the editing session unnecessary by solving the zoom problem during recording rather than after.
CursorClip tracks your cursor as you move through your product’s interface. When you click a small menu item, the recording zooms in. When you navigate to a new section, the recording pans with you. When the interaction is complete and you move to the next step, the recording settles into position for what comes next. All of it happens automatically during recording, at no extra time cost.
When you stop recording, the auto-zoom is already applied. There are no keyframes to adjust. No export-review-adjust-re-export loop. The recording is the output.
The difference in time is significant: a product video that takes 90 minutes to record and edit with a traditional workflow takes 20 minutes to record and export with auto-zoom recording. That’s not a marginal efficiency gain. It’s the difference between making product videos regularly as part of shipping things, versus making them occasionally when someone schedules a dedicated video session.
If your product video is specifically a SaaS demo, use this guide to choosing a screen recorder for SaaS demos on Mac.
What “No Editing” Actually Requires From Your Recording
Eliminating the editing session doesn’t mean recording carelessly. It means shifting the work that editing does into the recording itself. Three things make this work in practice:
- Deliberate cursor movement, recording at 60 to 70% of your natural speed, pausing one full second before each click, replaces the speed-correction editing step
- Window capture instead of full screen, frames the recording around your product and removes dock, tabs, and desktop clutter that editing would normally crop out
- Stopping on the result frame, ending the recording when the payoff is visible replaces the end-trim editing step
With these three things in place, the recording is the product video. The auto-zoom preview in CursorClip plays immediately after you stop recording. One watch-through confirms the interactions are clear. Export. Done.
When You Actually Do Need an Editor
Being honest here: there are cases where editing genuinely earns its time.
Multi-clip assembly. If you’re recording yourself presenting in separate takes and want to cut between them, intro, demo, close, you need an editor to stitch them together. CursorClip records one continuous take. Its timeline handles cuts, trims and speed changes, but it is not a multi-track editor and can’t open footage it didn’t record. For multi-take assembly, tools like Descript or ScreenFlow are more appropriate.
Complex narration sync. If your audio narration needs to be precisely timed to specific visual moments, a timeline editor gives you that control. Silent recordings and naturally paced narration don’t require this. Heavily scripted narration with tight timing does.
Trimming an unusable start or end. If the first five seconds of a recording have a mistake that can’t be left in, basic trimming is necessary. CursorClip includes segment trim and split controls for recordings made in the app; QuickTime Player remains a simple option for an existing file recorded elsewhere.
For the vast majority of product demos, feature walkthroughs, and onboarding recordings, none of these apply. The cases where editing genuinely earns its place are specific:
- Multi-take assembly, recording yourself in separate clips you want to cut between
- Precisely timed narration sync, scripted audio that needs to hit specific visual moments
- Trimming an unusable start or end. For this, QuickTime’s built-in trim handles it without a full editor
One take, one recording, auto-zoom handles the presentation, export and ship.
The Complete Workflow
Here’s the full process from nothing to a published product video, without a video editor touching it:
- Decide the single workflow to show, one scenario, one result for your primary buyer
- Set up a demo account with realistic, plausible-looking data
- Enable Do Not Disturb (System Settings → Focus → Do Not Disturb)
- Open CursorClip and select your application window (not full screen)
- Rehearse the workflow once at recording speed before hitting record
- Hit record and navigate at 60 to 70% of your natural speed
- Pause one full second before each click to let the auto-zoom settle
- Stop recording the moment the result frame is visible
- Watch the auto-zoom preview and confirm all interactions are readable
- Export as MP4 for landing page, GIF for changelog, email, and social
Total time for a 75-second product video: 25 to 35 minutes including setup. After the first time, when the demo account is already configured and the flow is familiar, it’s closer to 15.
Compare that to the traditional workflow: record (15 minutes), import into editor, add zoom keyframes (45 to 60 minutes), export, review, adjust (15-20 minutes), final export. A solid two hours for the same output.
Format Decisions Without an Editor
One part of the video production process that traditionally happens in post-production is choosing and optimizing the export format. Without an editor, this happens at the export step.
| Destination | Format | Why |
|---|---|---|
| Website landing page | MP4 | autoplay muted playsinline loop, plays without a click |
| Changelog | GIF or MP4 | GIF autoplays everywhere; MP4 on pages you control |
| Email announcement | GIF | Most email clients play GIFs inline without a click |
| Twitter / X | GIF or MP4 | Both work; GIF loops more reliably |
| Slack | GIF | Plays inline, no interaction needed |
| Pitch deck | MP4 | Embedded video slide |
| MP4 | Captions recommended, most LinkedIn video plays muted |
CursorClip exports both MP4 and GIF from the same recording. Export the MP4 for the landing page and the GIF for the changelog in the same session. No conversion step, no third-party tool.
The Real Cost of the Traditional Workflow
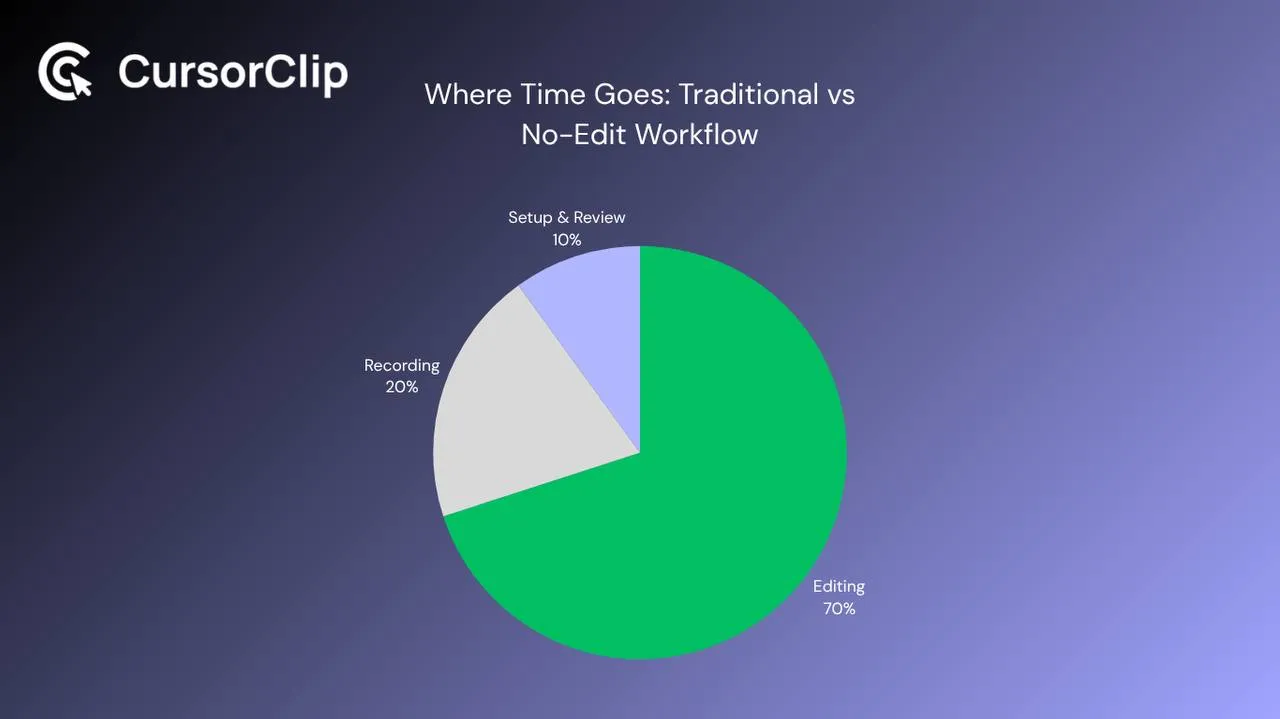
Making product videos with a video editor isn’t just slow. It creates a structural barrier that keeps product videos infrequent.
When every recording requires an editing session, product videos become a project rather than a habit. They get scheduled, then rescheduled, then deprioritized when shipping pressure increases. The changelog goes without a video. The landing page demo goes months without being updated after a UI change. The email announcement ships with a static screenshot instead of a GIF.
The teams that publish consistent, current product video content aren’t doing more work. They’re doing less work per video. When the per-video time cost drops from two hours to twenty minutes, video becomes something that happens alongside shipping rather than something that requires a separate initiative to pull off.
That’s the actual case for making product videos without video editing. Not that editing is hard to learn. Not that the tools are too expensive. It’s that the editing step creates a time cost that’s high enough to turn video from a regular activity into a rare one.
Frequently Asked Questions
Can you really make a professional product video in one take with no editing?
Yes, if the recording handles what editing would normally handle. Cursor-follow auto-zoom replaces manual zoom keyframes. Deliberate cursor speed and pausing before clicks replaces speed adjustments. Recording window capture instead of full screen replaces cropping. Stopping on the result frame replaces end trimming. When the recording is set up correctly, there’s nothing left for editing to do.
What if I make a mistake mid-recording?
For small verbal stumbles or brief cursor hesitation, keep recording. Minor errors in product videos are either invisible to viewers or make the recording feel more human. Both are acceptable. For significant structural mistakes, like navigating to the wrong feature or missing a critical step, stop and re-record from the start. With a short workflow (75 to 90 seconds), a re-record takes three minutes, not three hours.
Is there a quality difference between an edited video and a one-take auto-zoom recording?
For the zoom and pacing aspects: no visible difference, because CursorClip’s cursor-follow auto-zoom produces the same result as manually placed zoom keyframes. For audio: the quality depends on your microphone setup, not whether you edited the recording. A USB microphone close to your face produces the same audio quality recorded live as it would in post-production.
What’s the minimum setup needed to do this?
CursorClip on a Mac running macOS 13.5 (Ventura) or later, a clean demo account, and Do Not Disturb enabled. If you’re narrating, a USB microphone (or AirPods as a baseline). If you’re recording silent, nothing additional. The whole setup takes five minutes.
Can I update the video quickly when my product UI changes?
Yes, and this is one of the strongest arguments for the no-edit workflow. When your UI changes and the video needs updating, re-recording a 75-second demo with a prepared demo account takes about 15 minutes. Re-editing a complex edited video with manual zoom keyframes tied to specific frame numbers takes considerably longer. The no-edit approach is inherently faster to update.
How do I handle audio if the built-in Mac microphone sounds bad?
If narrating: use a directional USB microphone positioned six to eight inches from your face. The built-in microphone captures room noise and reverb that no amount of post-processing fully corrects. If not narrating: the audio issue doesn’t apply. Silent recordings with auto-zoom work well for changelogs, social posts, and documentation without requiring any microphone setup.
The reason most product videos require editing isn’t that editing is unavoidable. It’s that most recordings are made with tools that don’t solve the zoom problem, leaving editors to fix afterward what recorders couldn’t handle during.
Fix the recording and the editor has nothing to do.
If you’re also working on other video formats, these guides cover related ground: how to make a SaaS demo video, how to make tutorial videos on Mac, and how to make a product explainer video without animation.