The safest way to record a Zoom, Google Meet, or Microsoft Teams call on a Mac is the platform’s own recording feature, when your account and your role in the meeting allow it, because participants are notified and the file stays inside the meeting workflow. Ask for permission first, every time. If built-in recording is not available to you and everyone on the call has agreed to an outside recording, use a Mac screen recorder that captures system audio and microphone audio together, and tell people you are doing it. Run a 10-second test before the real call: macOS permissions, headphones, notifications, and the save location all change the result.
Key takeaways
| Platform | Who can start a recording | Account or license requirement | Participants notified? | Where the file lands |
|---|---|---|---|---|
| Zoom (local recording) | Host, or a participant the host grants permission to via Allow Record | ”Basic (Free) account or above” plus the desktop app at or above the global minimum version | A participant is notified when recording privileges are granted to them; dial-in callers hear an automated message unless the host disables it | Local: the default Zoom recording folder, documented on macOS as /Users/[Username]/Documents/Zoom |
| Google Meet | Host by default; co-hosts, same-organization participants when Host Management is off, and Classroom teachers may also qualify | Business Plus, Business Standard, Essentials, Education Plus and several Enterprise tiers, or Google One with 2TB+, and an admin must turn recording on | ”Participants get a notification when the recording starts or stops” | Cloud: the meeting organizer’s Google Drive, in the “Google Meet” folder |
| Microsoft Teams | Anyone with a qualifying license, recording enabled by IT, who is not a guest or external user | Office 365 E1, E3, E5, F3, A1, A3, A5, M365 Business, Business Premium, or Business Essentials, plus admin enablement | ”All meeting participants will receive a notification in their Teams desktop, web, or mobile app as soon as a meeting recording starts” | Cloud: OneDrive for work or school and SharePoint, usually owned by the organizer |
| External Mac recorder | You, on your own machine, with the consent of everyone on the call | A recorder that captures system audio and microphone; macOS permissions granted | Not necessarily. It may not trigger the platform’s own recording indicator, so you must tell participants yourself | Wherever you save it on your Mac |
Every platform row is what that vendor’s own support page states, checked 10 August 2026. The source links are in each platform section below. Tier eligibility and license names are the most volatile facts on this page, so re-check them against the vendor page before you rely on them.
Get permission before you press record
Get explicit permission from everyone on the call before you record, whichever method you use. Recording laws and workplace policies vary by country, by state or region, and by employer, and nothing on this page is legal advice. If you are unsure, ask your legal or compliance contact, and ask the participants. Microsoft’s own recording page notes that depending on your region, consent requirements may apply.
Two things are worth saying plainly, because they are the reason this section comes before the instructions rather than after them:
- An external recorder captures what happens on your Mac. It records the screen and the audio coming out of your speakers, which is a different mechanism from the meeting platform’s own recording. That means it may not trigger the platform’s native recording indicator or notification.
- That is a reason to tell participants, not a feature. If the platform is not announcing the recording on your behalf, the announcement is your job. Say it at the start of the call, get an audible yes, and note it in the meeting notes. This page does not cover, and will not help with, recording people who have not agreed to it.
If anyone objects, stop. A shared summary, a written follow-up, or a re-recorded walkthrough after the call are all better outcomes than a recording someone did not agree to.
Built-in recording versus an external Mac screen recorder
Built-in recording and external capture solve the same problem in very different ways, and the differences that matter are permission, notification, and where the file ends up. Use this to decide before you set anything up.
| Question | Platform’s built-in recording | External Mac screen recorder |
|---|---|---|
| Who is allowed to use it | Gated by account tier, meeting role, and often an admin setting | Anyone on the Mac, which is precisely why consent matters more |
| Participant notification | Documented by each platform (see the table above) | Not guaranteed. You announce it |
| Host or admin dependency | Yes on all three platforms | No |
| Where the file goes | Zoom local: your Mac. Meet and Teams: cloud storage owned by the organization | Your Mac, in the folder you choose |
| What it captures | The meeting as the platform composes it | Whatever is on your screen, including notifications and anything else visible |
| Speaker labels, transcript, meeting metadata | Platform-dependent, and out of scope for this page | No. A screen recorder produces video and audio, nothing else |
When external capture is the appropriate choice: your account tier does not include recording, you are a guest in someone else’s tenant, you need a local file rather than a cloud link, or you are capturing your own demo or presentation inside a call. In every one of those cases, the consent step above still applies.
When it is not: if built-in recording is available to you, use it. It notifies participants for you, it keeps the recording attached to the meeting’s retention and access rules, and it is the option your organization’s policy most likely expects.
Before you record on macOS: permissions and a 10-second test
Set up macOS permissions and run one short test recording before the meeting starts, because the two most common failures (no audio at all, or no narration) are both configuration problems you cannot fix afterwards.
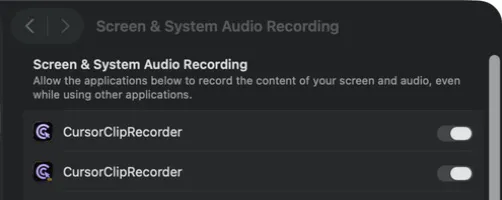
- Grant Screen & System Audio Recording. Apple documents the path as Apple menu > System Settings, then Privacy & Security > Screen & System Audio Recording (Apple’s current pane name as of 10 August 2026). For each app you can turn recording on or off, and allow it to record screen and audio, or audio only. On macOS Monterey and earlier the equivalent lives in System Preferences > Security & Privacy > Privacy.
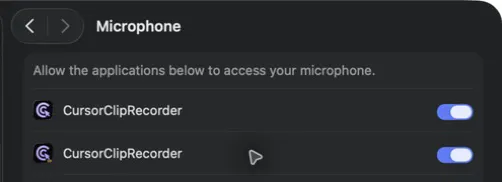
- Grant Microphone separately. Apple documents Microphone as its own toggle under Privacy & Security. One grant does not imply the other. Camera is a third, independent grant.
- Grant the same permissions to the meeting app. Zoom, Meet in a browser, and Teams all need screen and microphone access on macOS in their own right. Google notes that on macOS Sequoia, users must select “Allow” for Google Chrome permissions when prompted in order to record or share their screen.
- Wear headphones. Speaker output feeding back into your microphone is the usual cause of echo and doubled audio in a recorded call.
- Silence notifications. Turn on a Focus mode and quit anything that shows message previews. An external recorder captures your whole screen, including a banner from a private conversation.
- Check disk space and the save location before the call, not during it.
- Record 10 seconds, then play it back. Speak a sentence, play a short sound from the other side of the call or from any app, stop, and listen to the export. You are checking for three things: your voice present, the other audio present, and the two at usable relative levels.
How to record a Zoom meeting on a Mac
Start with Zoom’s own local recording, because it is available on free accounts and it keeps the file on your Mac. Zoom states that local recording requires a “Basic (Free) account or above” and the Zoom desktop app for Windows, macOS or Linux at the global minimum version or higher, per Zoom’s local recording article (checked 10 August 2026). Cloud recording is a separate paid feature and is not covered here.
What Zoom documents about permission and notification:
- The host must start the recording, or must explicitly grant recording permission to a participant. Zoom states the host does this from the Participants menu by clicking Allow Record.
- Participants receive a notification when recording privileges are granted to them.
- Dial-in phone participants hear an automated message that recording is active, unless the host disables it.
Where the file goes. Zoom saves local recordings to the default Zoom recording folder, with video files named video[number].mp4 and audio-only files audio[number].m4a. The default macOS path is documented as /Users/[Username]/Documents/Zoom on Zoom’s recording location article (checked 10 August 2026). Zoom warns against setting the default recording location to a cloud-syncing folder, an external drive, or network storage, as it “may cause issues with saving and converting”.
Documented control path. In the Zoom desktop app, use Record in the meeting controls toolbar, then choose Record on this Computer if Zoom shows a destination menu. While recording, the same controls expose Pause/Resume and Stop. This path comes from Zoom Support’s computer-recording guide, checked 14 August 2026. Labels may vary by account and release.
Capturing an authorized Zoom call outside Zoom
Use this only when Zoom’s own recording is unavailable to you and everyone on the call has agreed. Announce the recording at the start of the call. The workflow is the generic one: grant the macOS permissions above, enable system audio and microphone in your recorder, choose your capture area, run the 10-second test, then record.
Zoom failure modes worth knowing:
- No Record control. You are not the host and have not been granted permission. Ask the host.
- Recording exists but has no meeting audio. The recorder captured screen and microphone but not system audio. Check the system audio toggle and the Screen & System Audio Recording grant.
- Recording will not save or convert. Check the destination folder, especially if it is a synced or external location.
How to record a Google Meet call on a Mac
Google Meet recording is an account-tier feature, so the first question is not how but whether your edition allows it. Per Google’s Meet recording help page (checked 10 August 2026), recording is available on Business Plus, Business Standard, Essentials, Education Plus, several Enterprise tiers, and for “Google One subscribers with 2 TB or more storage space”. Google also states that “a Google Workspace administrator must turn on recording for your account”. Recording is not available on a free personal Google account.
Who can record. Google states the host can record by default. Co-hosts (including promoted external co-hosts), participants in the same organization as the host when Host Management is off, and teachers or co-teachers in Google Classroom meetings may also be able to. Google’s stated hard constraint: “even if you have the necessary permissions, you can’t record a meeting if the host doesn’t have them.”
Notification. Google states: “Participants get a notification when the recording starts or stops.” People using mobile apps, and participants outside the organization, cannot control recording.
Where the file goes. To the meeting organizer’s Google Drive, in the “Google Meet” folder, with an email link sent to the organizer and to whoever started the recording. Google states a meeting can be recorded for a total of eight hours, after which recording stops automatically.
On macOS, Google states that on macOS Sequoia, users must select “Allow” for Google Chrome permissions when prompted in order to record or share their screen. Google’s page names Sequoia specifically and had not been updated to name any later macOS release as of 10 August 2026.
Documented control path. On a computer, use Activities at the bottom right, choose Recording, then Start recording and confirm Start. To finish, return to Activities > Recording > Stop recording and confirm. This path comes from Google Meet Help, checked 14 August 2026. Labels may vary by account and release.
Capturing an authorized Google Meet call outside Meet
This is the common case for guests, personal Google accounts, and anyone whose admin has not enabled recording. It is also the case where consent matters most, because Meet’s own notification will not fire. Say clearly at the start of the call that you are recording locally, and get agreement on the call.
How to record a Microsoft Teams meeting on a Mac
Teams recording is gated by license and by IT admin policy rather than by anything Mac-specific. Per Microsoft’s Teams recording page (checked 10 August 2026), a person can start or stop a recording if they hold a qualifying license, have recording enabled by their IT admin, and are not a guest or an external user. Microsoft lists the qualifying licenses as “Office 365 Enterprise E1, E3, E5, F3, A1, A3, A5, M365 Business, Business Premium, or Business Essentials”. Some of those names are legacy branding, and the SKU list changes, so re-check it before relying on it.
Extra controls on paid add-ons. Microsoft states that with Teams Premium or Copilot licenses, organizers can restrict who may record to “Organizers and co-organizers”, “Organizers, co-organizers, and presenters”, or “No one”. That is an add-on capability, not base behavior in every tenant.
Notification. Microsoft states: “All meeting participants will receive a notification in their Teams desktop, web, or mobile app as soon as a meeting recording starts.” The page also notes that depending on region, consent requirements may apply. The meeting organizer does not need to be present for an in-progress recording to continue.
Where the file goes. Recordings are stored in OneDrive for work or school and SharePoint, with the organizer typically owning the file. Expiration timelines are set by admin policy. On expiry a recording goes to the recycle bin and is recoverable for “up to 90 days” before permanent deletion, so a recording you assume is archived may not be.
Mac specifics. Microsoft’s recording page is platform-agnostic and documents no Mac-only recording behavior. The macOS screen and microphone permission requirements described above come from Apple, not from Microsoft.
Documented control path. In the meeting controls, choose More actions > Record and transcribe > Start recording, then confirm. To finish, use More actions > Record and transcribe > Stop recording. This path comes from Microsoft Support, checked 14 August 2026. Labels may vary by account and release.
Capturing an authorized Teams call outside Teams
Guests and external users cannot record in Teams at all, which makes this the most common external-capture scenario of the three. It is also the one most likely to be governed by the other organization’s policy, so ask the organizer, not just the participants.
What to look for in a Mac recorder for authorized call capture
If built-in recording is off the table, judge a Mac recorder on six things rather than on its feature list length.
- System audio and microphone at the same time. This is the whole job. A recorder that captures only the microphone gives you your own voice and a muffled room, not the call.
- No virtual audio driver needed. Cap states “no BlackHole, no Loopback, no virtual audio drivers required” (cap.so, checked 10 August 2026), and CleanShot X’s changelog for version 4.6 (5 September 2023) states computer audio recording “no longer requires additional drivers”. A Telestream page dated February 2012 says ScreenFlow installs its Audio driver, but it names no current macOS or ScreenFlow version, so confirm that requirement against the current installer.
- Capture area control. Recording the meeting window rather than the whole desktop reduces the chance of capturing a notification or a private tab.
- A level check before you start, so you know the audio is arriving before the call rather than after.
- Local files rather than an upload step. If the point of external capture is to hold the file yourself, a share-link-first tool works against you.
- Honest limits you can live with. Frame rate caps, export formats, and length limits vary. Read them before the call, not during the export.
For the generic macOS audio steps, including macOS 27’s built-in Include System Audio option and the legacy driver route, see how to screen record on a Mac with audio, which also compares Mac recorders with system audio and microphone. You can also use the broader roundup of the 13 best screen recorders for Mac.
How to choose: built-in, external, or neither
Answer these in order and stop at the first one that applies.
- Do you have permission from everyone on the call? If no, stop here. Nothing below applies.
- Does your account and role allow the platform’s own recording? If yes, use it. It notifies participants, and the file inherits your organization’s retention rules.
- Are you a guest or on a free personal account, and does everyone agree to a local recording? Use an external Mac recorder with system audio and microphone enabled, and announce it verbally.
- Do you need speaker labels, a transcript, or captions? No screen recorder produces those. You need the platform’s own recording, or a dedicated transcription service, and both of those are separate decisions from this page.
- Do you only need the content, not the conversation? Consider recording a clean walkthrough on your own afterwards instead. It is shorter, it has no consent problem, and it usually looks better.
Use-case cheat sheet
| Scenario | Recommended route | Why |
|---|---|---|
| Internal all-hands on Teams, you have an E3 license | Teams built-in recording | Participants are notified automatically and the file lands in OneDrive or SharePoint |
| Zoom call on a free account, host is you | Zoom local recording | Zoom states local recording works on “Basic (Free) account or above” |
| Zoom call, you are a participant | Ask the host for Allow Record | Zoom requires host authorization; you are notified when it is granted |
| Meet call on a free personal Google account | External recorder, with consent | Recording is not available on free personal accounts |
| Meet call, your admin has not enabled recording | Ask the admin first, then external capture with consent | Admin enablement is a stated prerequisite |
| You are a guest in another company’s Teams tenant | Ask the organizer to record, or capture externally with their agreement | Guests and external users cannot record in Teams |
| Customer interview you need as a local file | Platform recording if available, otherwise external with explicit consent | Cloud-stored recordings may not be yours to keep |
| Recording your own demo shown during a call | Record the demo separately before or after the call | No consent complication, and a cleaner result |
| You need a transcript or speaker labels | Platform recording, or a transcription service | A Mac screen recorder does not produce these |
| Course or lesson delivered over a call | Platform recording where the tier allows | Retention, access, and notification are handled for you |
Recording an authorized call with CursorClip
CursorClip is a Mac screen recorder, so its role here is the external-capture case only, after you have permission and after the platform’s own recording has been ruled out. The workflow, as implemented in the source audited on 10 August 2026:
- Enable System Audio and Microphone. Both are independent toggles on the recorder controls and both can be on for the same recording, which is what puts the remote participants’ audio and your own voice into one file.
- Choose what to capture. Record the display, or drag an area around the meeting window to keep the rest of your desktop out of the file.
- Run the 10-second test from the checklist above and play the export back before the call.
- Record, then review and export. Recording and editing are free; a paid license is required to export. Exports are MP4 (H.264 by default), with MOV and HEVC also available.
The honest audio caveat that matters for meetings. With system audio and microphone both enabled, CursorClip drops the recording frame rate to 30fps once the capture area reaches roughly 5.5 megapixels. A full-screen meeting on a 4K or 5K display is normally past that threshold, so a dual-audio call recording will not capture at 60fps. For a talking-heads call that is a fine trade, but know it before you promise anyone a 60fps file.
Other limits to state plainly. CursorClip edits only its own recordings, not files captured elsewhere. Auto zoom is generated from your clicks and then follows the cursor inside each zoom, which suits a screen-share walkthrough and does nothing for a grid of faces. Webcam capture uses a medium-quality session, so it is not an HD webcam track. GIF export is blocked for recordings of 10 minutes or longer, which most meetings exceed. Your recordings never leave your Mac, because recording and editing happen on-device and there is no upload path for media; the app itself does contact licensing, update, crash-reporting and analytics endpoints, so “fully offline” would be the wrong description. It requires macOS 13.5 or later on Apple silicon or Intel, and on macOS 13 and 14 the microphone is captured through a separate audio session and merged at export, so behavior is not identical across OS versions.
You can see the capability list on the system audio and microphone capture page, download CursorClip to run the 10-second test, and check CursorClip plans once the test passes.
Prefer the platform’s built-in recorder whenever it is available and permitted. CursorClip is the local external-capture route; it does not produce separate speaker tracks, meeting metadata, transcripts or captions, so confirm that system audio and microphone both survive a short test export before the call.
Troubleshooting Mac meeting recordings
Most recording failures on a Mac fall into six buckets, and five of them are fixable in under a minute if you catch them in the test rather than in the export.
The recording control is missing. On Zoom you are not the host and have not been granted permission. On Meet your edition may not include recording, or an admin has not enabled it. On Teams you may be a guest or external user, your license may not qualify, or the organizer may have restricted recording using a Teams Premium or Copilot control. In all three cases the fix is a request, not a workaround.
Video is fine but the meeting audio is missing. The system audio source was not enabled, or the recorder does not hold the Screen & System Audio Recording permission. Apple documents that grant as allowing an app to record screen and audio, or audio only, so check that the audio side is actually on and not just screen capture.
Your narration is missing. The Microphone grant is separate from the screen grant, and the recorder may be pointed at the wrong input device. Check both, then re-run the test.
Echo or doubled audio. Speaker output is being picked up by your microphone, or the same audio is arriving on two paths. Headphones solve the first. For the second, record one audio source at a time in the test to identify which path is duplicated.
Notifications or private content ended up in the file. Turn on a Focus mode before the call and record a limited area rather than the whole desktop. This is a planning fix, not an editing fix.
You cannot find the output file. Zoom local recordings go to the default Zoom recording folder (/Users/[Username]/Documents/Zoom on macOS as documented). Meet recordings go to the organizer’s Drive, and Teams recordings to OneDrive or SharePoint, which means the file may not be yours at all. External recordings go wherever you set the save location, which is worth confirming before the call.
Frequently asked questions
Permission and notification
Can participants record without host permission?
Not on any of the three platforms by default. Zoom states the host must start the recording or explicitly grant a participant permission with Allow Record. Google states the host can record by default, and that even with the necessary permissions you cannot record if the host does not have them. Microsoft states a person can record only with a qualifying license, with recording enabled by their IT admin, and not as a guest or external user. All three checked 10 August 2026.
Does everyone know when the meeting is recorded?
For built-in recording, the platforms document notifications. Google states participants get a notification when the recording starts or stops. Microsoft states all participants receive a notification in the Teams desktop, web, or mobile app as soon as recording starts. Zoom states a participant is notified when recording privileges are granted to them, and that dial-in participants hear an automated message unless the host disables it. An outside screen recorder running on your Mac may not trigger any of these platform indicators, which is exactly why you should say out loud that you are recording.
Audio capture on a Mac
Can QuickTime record meeting audio?
Only on macOS 27 or later. QuickTime’s File > New Screen Recording opens the Screenshot toolbar, and on macOS 27 or later its Options include Include System Audio, which captures the sound coming out of your Mac, remote participants included (Apple Support article 102618, published 14 September 2026, checked 6 October 2026). On macOS 26 and earlier, Apple documents only a Microphone selection, so QuickTime captures what your microphone hears but not the call itself. Either way, get everyone’s consent before you record.
Can I record system audio and microphone together on a Mac?
Yes, with a third-party recorder that supports both. Several vendors state their apps capture system audio without a virtual audio driver, and CursorClip’s system audio and microphone settings are independent toggles that can both be on for the same recording. One honest caveat: with both audio sources enabled, CursorClip caps the recording frame rate at 30fps once the capture area reaches about 5.5 megapixels, which a full-screen meeting on a large display will normally exceed.
Files and storage
Where are meeting recordings saved?
It depends on the method. Zoom local recording saves to the default Zoom recording folder, documented on macOS as /Users/[Username]/Documents/Zoom, with video files named video[number].mp4. Google Meet recordings save to the meeting organizer’s Google Drive in the Google Meet folder. Microsoft Teams recordings are stored in OneDrive for work or school and SharePoint. An external Mac recorder saves wherever you point it, on your own disk. All platform paths checked 10 August 2026.
Sources and dates
Platform behavior on this page is what each vendor’s own support documentation states, captured 10 August 2026: Zoom local recording, Zoom recording location, Google Meet recording, Microsoft Teams recording, Apple on Screen & System Audio Recording, Microphone and Camera access, Apple on taking screenshots or screen recordings, Apple on how to record the screen on Mac (published 14 September 2026, checked 6 October 2026, the source for macOS 27’s Include System Audio option), and Apple on recording your screen in QuickTime Player.
Account tiers, license names, and admin requirements change often. Re-capture the three platform pages on the day you publish or the day you rely on this.
Related reading
- Fixing system audio generally: how to screen record on a Mac with audio covers the permission and input problems that cause most silent recordings.
- Choosing a recorder for this job: every Mac screen recorder compared.
- If the call is really a demo: how to make tutorial videos on Mac is usually a better format than recording a live call.
- Afterwards: compress the recording before sending it, since an hour-long call at full resolution is a large file.
Run the ten-second test before the real call
Permissions, headphones, notifications and output location all fail quietly. Ten seconds of test recording, played back before anyone joins, catches every one of them.