To edit a screen recording on a Mac, open it in QuickTime Player. Use Edit > Trim to cut the beginning or end, and use View > Show Clips with Edit > Split Clip to cut the recording into pieces and drag them into a new order. Move to iMovie when you need cropping, titles, speed changes or audio work, all of which Apple documents for iMovie and not for QuickTime Player. Both apps cost nothing. The third method is different in kind: rather than editing the file you have, you change how the next recording is captured so there is less to fix.
Key takeaways
| Edit you need | Tool | Documented path | Cost |
|---|---|---|---|
| Trim the start or end | QuickTime Player | Edit > Trim, drag the yellow handles | Free |
| Cut a mistake, reorder sections | QuickTime Player | View > Show Clips, Edit > Split Clip, drag to reorder | Free |
| Crop, titles, speed, audio levels | iMovie | Cropping, Speed and Volume controls, Titles browser | Free from the Mac App Store |
| Export with format and compression choices | iMovie | File > Share > File | Free from the Mac App Store |
| Less editing next time | CursorClip | Record in CursorClip, adjust the automatic zoom points, export | Free to record and edit, paid license to export |
Every Apple Support page linked below was captured on 10 August 2026. Apple states these procedures; this article does not present them as reproduced testing.
Which Mac tool to use for each kind of edit
Pick by the edit you need, not by which app is more powerful.
- Only the start and end need to go: QuickTime Player. Apple documents one Trim command for this.
- A mistake in the middle, or two sections out of order: QuickTime Player, using Show Clips and Split Clip. If the seam then needs a title or audio balancing, move to iMovie.
- Cropping, titles, speed or volume: iMovie. Apple documents all four for iMovie and none for QuickTime Player.
- Multi-track compositing, animation or captions: neither Apple app, and not CursorClip. The beginner video editor roundup owns that choice.
No recording yet? The complete Mac screen recording guide covers how to record a new screen video on Mac, and this guide explains how to make a product video without a full editing session.
Before you edit: duplicate the file and check its format
Duplicate the recording first, because both apps can write over your only copy. Select it in the Finder, press Command-D, and edit the duplicate. QuickTime Player saves edits back into the movie you opened, and Apple’s split procedure ends with File > Save.
Then confirm what you have. Apple states that recordings made with the Shift-Command-5 Screenshot toolbar are saved as .mov files to the desktop, with filenames beginning “Screen Recording” and including the date and time (Apple Support). Apple states the extension there, not the codec, so do not assume H.264 or HEVC. Recordings made through QuickTime Player’s own File > New Screen Recording flow are saved wherever you chose in its Options menu (Apple Support), so “always on the desktop” is not safe.
Method 1: Trim, split and rearrange in QuickTime Player
QuickTime Player handles four documented clip operations: trimming a movie, trimming a clip inside a movie, splitting a movie into clips, and rearranging those clips. That is the whole editing surface Apple documents for it.
Step 1: Trim the start and end
Open the movie, choose Edit > Trim, drag the yellow handles in the trimming bar so the part you want to keep sits inside them, then click the Trim button. Apple states that “the area outside of the yellow handles is the area to be trimmed”, and adds a precision tip: “To make more precise edits, click and hold a handle to see individual frames of the clip” (Apple Support: Trim a movie or clip). Apple documents no keyboard shortcut for Trim, so ignore any guide that gives you one.

Step 2: Split the recording into clips
Choose View > Show Clips, put the playhead (the red vertical line) where the split should happen, then choose Edit > Split Clip. The movie divides into two clips. Repeat as needed, click Done, then save with File > Save. Apple documents that Left and Right Arrow move the playhead in small increments and Option plus an Arrow key moves it to the beginning or end of a clip (Apple Support: Split a movie into clips). Those keys move the playhead only: Apple documents no key equivalent for Split Clip, and iMovie’s Command-B belongs to a different app. If Save is dimmed, Apple’s instruction is to click the red close button at the upper left, supply clip information, then click Save.

Step 3: Cut a mistake out of the middle
Split where the mistake begins, then trim the clip that follows. Apple documents the per-clip trim separately: View > Show Clips, double-click the clip, “Drag the yellow handles in the trimming bar to select the portion of the clip that you want to keep”, then click Trim. Combining the two is a reading of two documented procedures rather than one Apple publishes, and it was not reproduced here.
Apple’s current split guide says clips can be deleted after splitting and says to delete unwanted parts before saving an individual clip, but it does not name the delete command or keyboard shortcut. This guide therefore uses the documented split-and-trim workflow above.
Step 4: Rearrange the clips
Choose View > Show Clips, drag the clips into the order you want, then click Done (Apple Support: Rearrange movie clips). Apple notes the precondition: “If you have only one clip in the movie, there’s nothing to rearrange.” Drag and drop only, with no documented shortcut.
Step 5: Rotate or flip a clip
Choose View > Show Clips, select the clip so it is outlined in yellow, then use the rotate or flip command described in Apple’s Edit-menu guidance and click Done (Apple Support: Rotate or flip a clip).
QuickTime Player is a clip tool, not a layered editor. Apple documents no cropping, titles, speed control or volume envelope for it.
Method 2: Crop, retime, title and export in iMovie
iMovie covers what QuickTime Player does not. It is a free download from the Mac App Store rather than something you can assume is installed: the listing shows Price: Free, size 3.2 GB, version 10.4.4, and a requirement of macOS 15.6 or later (Mac App Store: iMovie, checked 10 August 2026). A Mac on macOS 13 or 14 will not install that version.
Apple’s “Apps included on your Mac” page does list iMovie, and opens by saying your Mac comes with a wide variety of apps already installed, but it qualifies the iMovie entry in the same breath: “(If iMovie isn’t installed on your Mac, you can get it from the App Store.)” (Apple Support, checked 10 August 2026). Apple never makes the unqualified claim, so neither does this page.
Step 1: Get the recording into iMovie
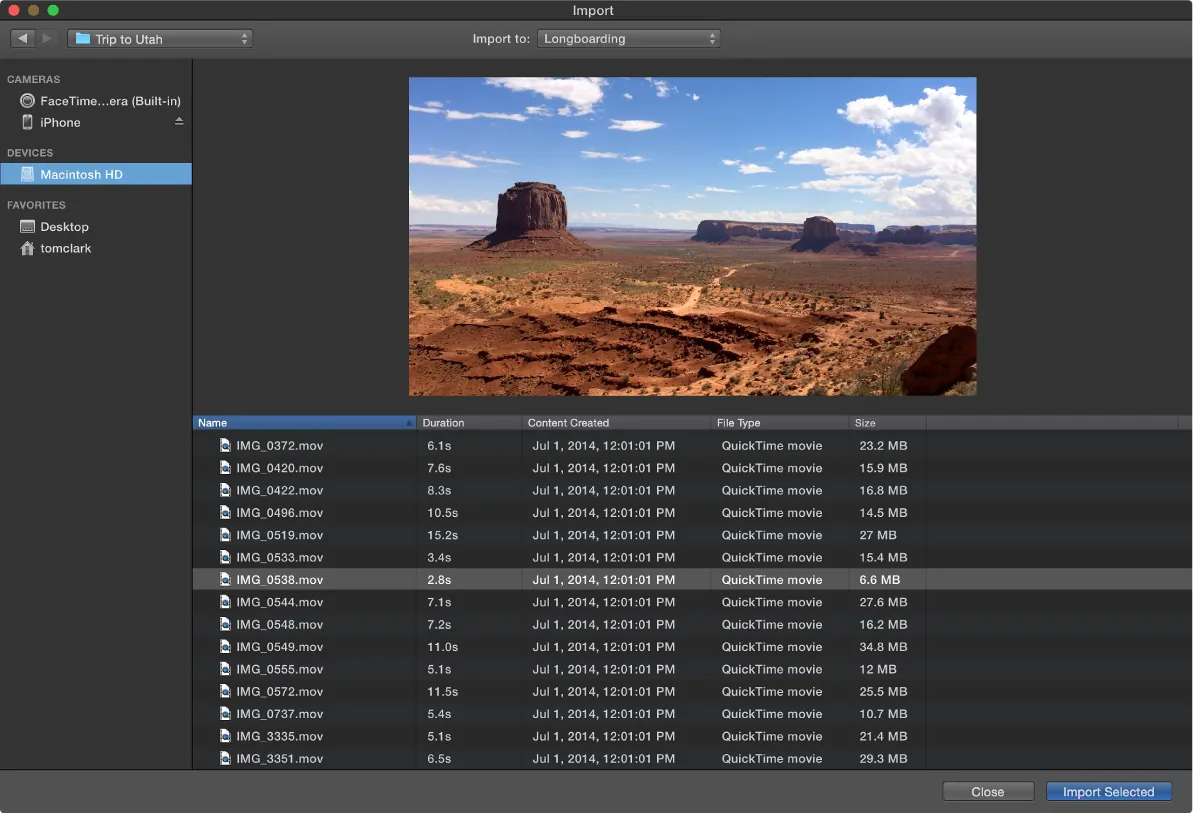
Select the file in the Finder and “drag the selection to an event in the Libraries list”; the clip appears in that event. Apple also documents an Import window (click Import in the toolbar, or Media then Import) for external devices (Apple Support: Import media from your Mac). Apple’s shortcuts page lists Command-I for “Import media” (Apple Support).
Step 2: Split a clip and remove a bad section
Select the clip, position the playhead, then choose Modify > Split Clip (Apple Support: Move and split clips). The shortcuts page lists Command-B against “Divide a clip at the playhead position”, so the menu path and the shortcut come from two different Apple pages. To remove the bad part without relying on an undocumented Delete command, use Apple’s range trim: hold the R key, drag across the part to keep, then Control-click the clip and choose Trim Selection (Apple Support: Trim clips). Split before the mistake, then range-trim the following clip so it starts after it. To reorder, select clips and drag them to a new location.
Step 3: Crop or fit the frame
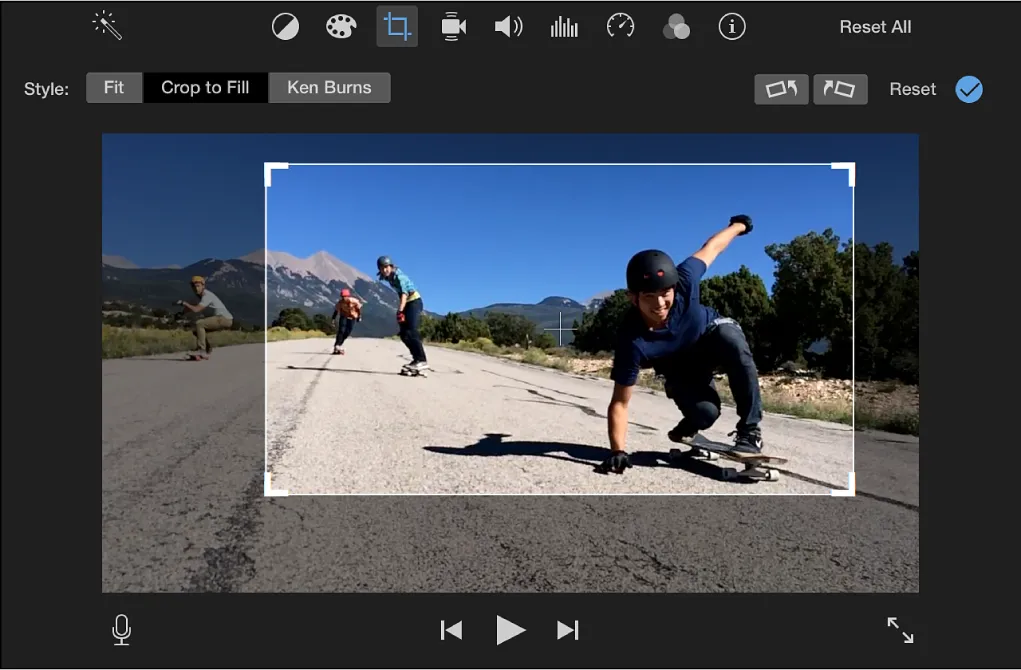
“To show the cropping controls, click the Cropping button.” In the timeline click Crop to Fill; a frame appears over the clip in the viewer, and Apple states “This frame is constrained to a 16:9 aspect ratio”. Move and resize it, then click Apply. In the browser that button is labeled Crop instead. Fit restores the clip’s original aspect ratio, which Apple notes produces black bars left and right when a 4:3 clip sits in a 16:9 project, and Reset clears crop and rotation (Apple Support: Crop clips).
Step 4: Change the speed without wrecking the narration
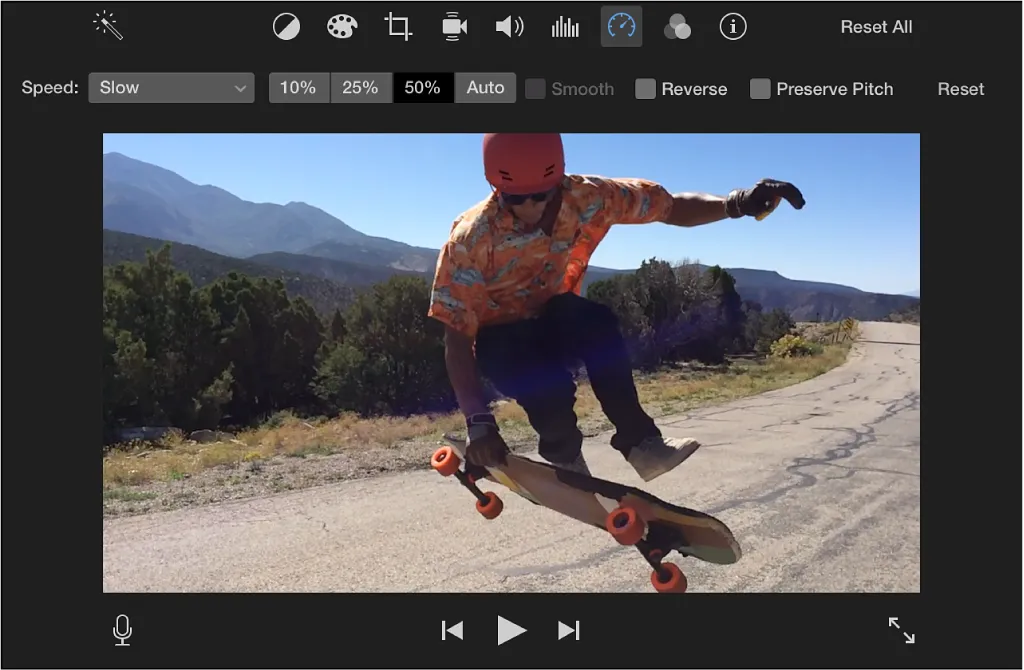
Select the clip, click the Speed button in the adjustments bar, choose Slow or Fast from the Speed pop-up menu, then click a speed button. Apple states Slow defaults to 50% and Fast to twice normal speed (2x), and Custom lets you “type a number in the field”. Then: “To preserve the original pitch of the audio, select the Preserve Pitch checkbox above the viewer”, because slowing a clip lowers audio pitch and speeding it up raises it (Apple Support: Change clip speed).
Step 5: Fix the audio levels
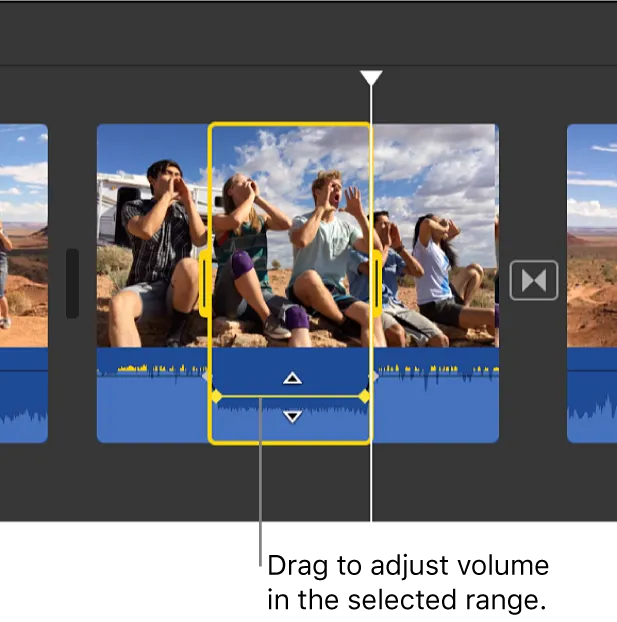
Select the clip and “Drag the volume control (the horizontal line across the audio waveform) up or down”. For part of a clip, hold R, drag across the portion, then drag the volume line inside that range; iMovie adds fades at the selection edges. To mute, click the Volume button, then Mute. For changes over time, “Press and hold the Option key and click the volume control” to add keyframes, then Control-click one and choose “Delete Keyframe” (Apple Support: Change audio volume).
Step 6: Add a title
Select Titles above the browser. Apple documents three placements: position the playhead and double-click a title, drag it above the clip, or drag it over the clip. Placement sets duration: a title dropped “in the first or last third of the clip” is adjusted to that third, while one dropped in the center runs over the whole clip. Double-click the placeholder text, type your text, then click Apply (Apple Support: Add titles).
Step 7: Export the finished file
Choose File > Share > File, then work down the dialog: Title, Description, Tags, the Format pop-up menu (video and audio, or audio only), the Resolution pop-up menu, the Quality pop-up menu (or Custom, where you “drag the slider to set the target bit rate”) and the Compress pop-up menu. Click Next, name the file, choose a location, and click Save (Apple Support: Export a movie, trailer or clip as a file). Do not pick a 4K preset for a sub-4K recording: upscaling adds file size and no detail. If the file is too large, use the Mac video compressor to compress the finished screen recording.
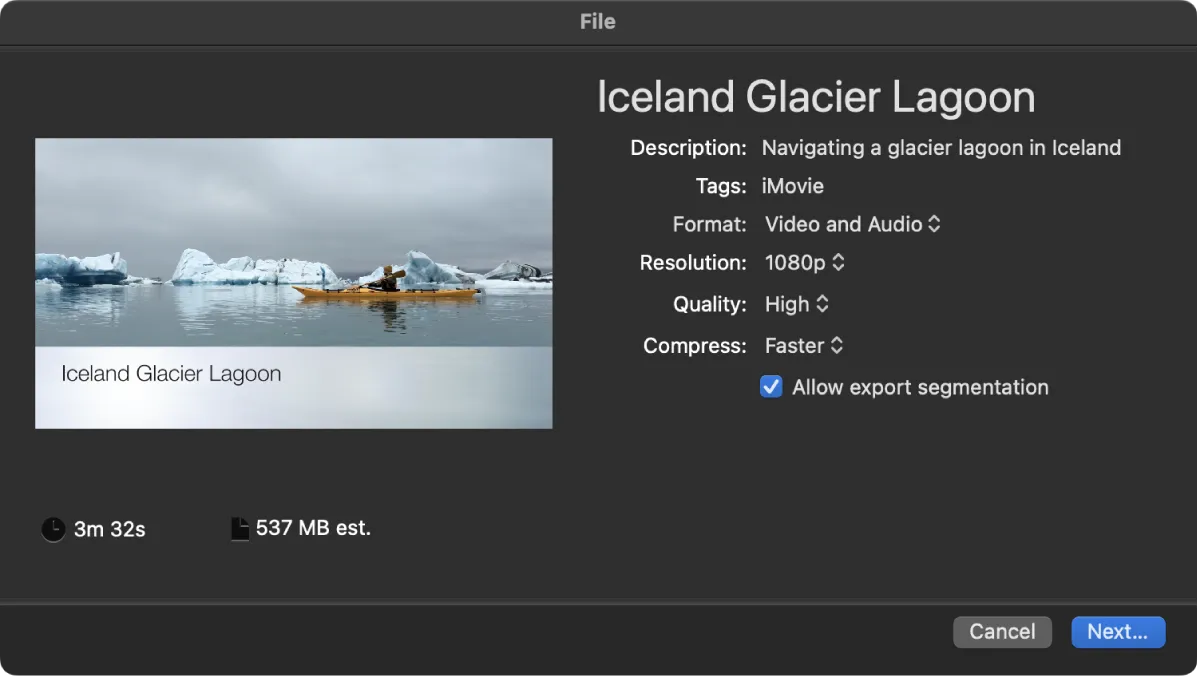
Apple names the controls but does not publish every value shown inside those menus, so choose from the options displayed by your installed iMovie version rather than relying on a fixed preset list.
Method 3: Make the next recording need less editing
The third method does not edit the file you already have. CursorClip edits only the recordings it made itself. It does not open or import existing video files. If a QuickTime .mov or an exported .mp4 is already on your disk, methods 1 and 2 are your two options. What CursorClip changes is the next recording:
- Record the screen in CursorClip. A native macOS app, universal for Apple silicon and Intel, deployment target macOS 13.5. It needs Screen Recording and Accessibility permission, because cursor tracking uses an event tap.
- Zoom points are placed automatically from your clicks, then follow the cursor inside each zoom. They are click-triggered, not movement-triggered.
- Adjust, add or remove those zoom points afterwards. Zoom regions cannot overlap and a zoom ends shortly before the video does. This is the automatic zoom and editable zoom points workflow.
- Trim and split the take into segments, set aspect ratio, background, camera overlay and cursor size, and enable or disable each audio source.
- Export as MP4/H.264, MOV or HEVC. Presets reach 4K (3840x2160) and 60 fps, but recording frame rate is capped by your display’s refresh rate and reduced further on large captures, so 60 fps at 4K or 5K is generally not achievable, and a 4K preset on a smaller source only upscales. GIF export covers recordings under 10 minutes at 640, 800 or 1080 px wide.
Recording and editing are free, so you can try a record-to-polish workflow before paying; a license unlocks export, after a one-time online activation. CursorClip pricing is $70 one-time, $29 a year or $9 a month (the site’s pricing constants, 16 September 2026). Across three years the annual plan totals $87 against the $70 one-time license, and the monthly plan totals $108 a year, which the annual plan undercuts by $79 a year, a 73% reduction.
Common problems and what actually fixes them
The split lands on the wrong frame
Nudge the playhead instead of dragging it. In QuickTime Player, Left and Right Arrow move it in small increments and Option plus Arrow jumps to a clip boundary; for trims, Apple’s tip is to click and hold a handle to see individual frames. In iMovie, set the playhead first, then run Modify > Split Clip.
Cropping cut off part of the interface
iMovie’s Crop to Fill frame is constrained to 16:9, so a crop that keeps a tall window always loses width. Click Fit to restore the original aspect ratio and accept the black bars, or click Reset and start again. If the UI genuinely does not fit 16:9, the fix is at capture: record a region shaped like the destination.
The narration sounds wrong after a speed change
Select the Preserve Pitch checkbox above the viewer. Apple states that slowing a clip lowers audio pitch and speeding it up raises it, and Preserve Pitch is the documented control. It sits above the viewer, not among the speed buttons, which is why it gets missed.
The export is huge or looks blurry
Blurry usually means upscaling, so never export above the source resolution. Huge usually means bit rate: iMovie’s export sheet exposes a Quality pop-up and a Custom target bit rate slider. Estimate video file size first with the bitrate calculator.
The finished video has the wrong aspect ratio
Decide the destination shape before editing. iMovie’s Fit button shows the clip’s true aspect ratio inside the project frame, black bars and all. If the source is the wrong shape, cropping is a compromise and re-recording at the right size is the fix.
Frequently asked questions
Editing with Apple’s free apps
Can I edit a screen recording in QuickTime Player?
Yes, within limits. Apple documents Edit > Trim, trimming an individual clip, splitting a movie with View > Show Clips and Edit > Split Clip, and rearranging clips by dragging. Apple documents no titles, cropping, speed or audio mixing in QuickTime Player, so those jobs belong in iMovie.
Is iMovie free?
Yes. The Mac App Store listing shows iMovie at Price: Free, version 10.4.4, requiring macOS 15.6 or later, checked 10 August 2026. No Apple page we could reach states iMovie is pre-installed on new Macs, so treat it as a free download.
Making specific edits
How do I remove a section from the middle of a screen recording?
Split where the mistake starts, then trim the clip that follows so it begins after the mistake. In QuickTime Player: Edit > Split Clip, then double-click the second clip and drag the yellow trim handles. In iMovie: Modify > Split Clip (Command-B), then an R-key range selection and Control-click > Trim Selection.
How do I crop a screen recording on Mac?
Use iMovie. Select the clip, click the Cropping button, click Crop to Fill in the timeline (the button is labeled Crop in the browser), position and resize the frame in the viewer, then click Apply. Apple states the frame is constrained to 16:9. Fit restores the original aspect ratio.
Exporting, and where CursorClip fits
How do I export a screen recording as MP4 on Mac?
iMovie exports with File > Share > File, where Apple documents Format, Resolution, Quality and Compress pop-up menus but never publishes the values inside them, so an MP4 option cannot be confirmed from Apple’s documentation. macOS screen recordings are .mov by default. CursorClip exports MP4/H.264, MOV and HEVC, but only for recordings made in CursorClip.
Can I open an existing screen recording in CursorClip and edit it?
No. CursorClip edits only the recordings it made itself and does not open external video files. If you already have a .mov or .mp4 on disk, use QuickTime Player or iMovie. CursorClip’s role is making the next recording need less editing.
Related reading
- Recording a new one: the complete Mac screen recording guide, and recording with audio if narration or app sound is involved.
- Choosing a recorder instead of an editor: every Mac screen recorder compared.
- Why the zoom matters: how auto-zoom screen recording works on Mac explains the part that removes most manual editing from a software walkthrough.
- Finishing up: compress the edited file or convert a MOV without uploading it anywhere.